
This chapter covers the Spring Framework's implementation of the Inversion of Control (IoC) [1] principle.
The org.springframework.beans and org.springframework.context packages provide the basis for the Spring Framework's IoC container. The BeanFactory interface provides an advanced configuration mechanism capable of managing objects of any nature. The ApplicationContext interface builds on top of the BeanFactory (it is a sub-interface) and adds other functionality such as easier integration with Spring's AOP features, message resource handling (for use in internationalization), event propagation, and application-layer specific contexts such as the WebApplicationContext for use in web applications.
In short, the BeanFactory provides the configuration framework and basic functionality, while the ApplicationContext adds more enterprise-centric functionality to it. The ApplicationContext is a complete superset of the BeanFactory, and any description of BeanFactory capabilities and behavior is to be considered to apply to the ApplicationContext as well.
This chapter is divided into two parts, with the first part covering the basic principles that apply to both the BeanFactory and ApplicationContext, and with the second part covering those features that apply only to the ApplicationContext interface.
In Spring, those objects that form the backbone of your application and that are managed by the Spring IoC container are referred to as beans. A bean is simply an object that is instantiated, assembled and otherwise managed by a Spring IoC container; other than that, there is nothing special about a bean (it is in all other respects one of probably many objects in your application). These beans, and the dependencies between them, are reflected in the configuration metadata used by a container.
The org.springframework.beans.factory.BeanFactory is the actual representation of the Spring IoC container that is responsible for containing and otherwise managing the aforementioned beans.
The BeanFactory interface is the central IoC container interface in Spring. Its responsibilities include instantiating or sourcing application objects, configuring such objects, and assembling the dependencies between these objects.
There are a number of implementations of the BeanFactory interface that come supplied straight out-of-the-box with Spring. The most commonly used BeanFactory implementation is the XmlBeanFactory class. This implementation allows you to express the objects that compose your application, and the doubtless rich interdependencies between such objects, in terms of XML. The XmlBeanFactory takes this XML configuration metadata and uses it to create a fully configured system or application.
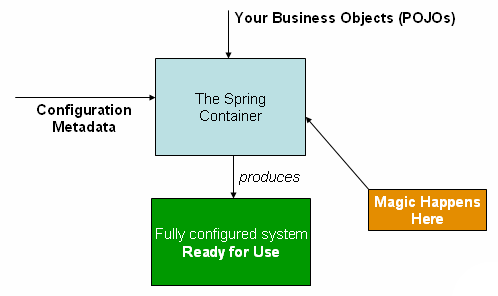
The Spring IoC container
As can be seen in the above image, the Spring IoC container consumes some form of configuration metadata; this configuration metadata is nothing more than how you (as an application developer) inform the Spring container as to how to “instantiate, configure, and assemble [the objects in your application]”. This configuration metadata is typically supplied in a simple and intuitive XML format. When using XML-based configuration metadata, you write bean definitions for those beans that you want the Spring IoC container to manage, and then let the container do it's stuff.
![[Note]](../images/admons/note.png) | Note |
|---|---|
XML-based metadata is by far the most commonly used form of configuration metadata. It is not however the only form of configuration metadata that is allowed. The Spring IoC container itself is totally decoupled from the format in which this configuration metadata is actually written. At the time of writing, you can supply this configuration metadata using either XML, the Java properties format, or programmatically (using Spring's public API). The XML-based configuration metadata format really is simple though, and so the remainder of this chapter will use the XML format to convey key concepts and features of the Spring IoC container. | |
Please be advised that in the vast majority of application scenarios, explicit user code is not required to instantiate one or more instances of a Spring IoC container. For example, in a web application scenario, a simple eight (or so) lines of absolutely boilerplate J2EE web descriptor XML in the web.xml file of the application will typically suffice (see Section 3.8.4, “Convenient ApplicationContext instantiation for web applications”).
At its most basic level, a Spring IoC container configuration consists of the definition of at least one bean that the container must manage, but typically there will be more than one bean definition. When using XML-based configuration metadata, these beans are configured as one or more <bean/> elements inside a top-level <beans/> element.
These bean definitions correspond to the actual objects that make up your application(s). Typically you will have bean definitions for your service layer objects, your data access objects (DAOs), presentation objects such as Struts Action instances, infrastructure objects such as Hibernate SessionFactory instances, JMS Queue references, etc. (the possibilities are of course endless and are limited only by the scope and complexity of your application).
Find below an example of the basic structure of XML-based configuration metadata.
<?xml version="1.0" encoding="UTF-8"?>
<beans xmlns="http://www.springframework.org/schema/beans"
       xmlns:xsi="http://www.w3.org/2001/XMLSchema-instance"
       xsi:schemaLocation="http://www.springframework.org/schema/beans/spring-beans-2.0.xsd">

  <bean id="..." class="...">
    <!-- collaborators and configuration for this bean go here -->
  </bean>

  <bean id="..." class="...">
    <!-- collaborators and configuration for this bean go here -->
  </bean>

  <!-- more bean definitions go here... -->

</beans>Instantiating a Spring IoC container is easy; find below some examples of how to do just that:
Resource resource = new FileSystemResource("beans.xml");
BeanFactory factory = new XmlBeanFactory(resource);
... or...
ClassPathResource resource = new ClassPathResource("beans.xml");
BeanFactory factory = new XmlBeanFactory(resource);
... or...
ApplicationContext context = new ClassPathXmlApplicationContext(
        new String[] {"applicationContext.xml", "applicationContext-part2.xml"});
// of course, an ApplicationContext is just a BeanFactory
BeanFactory factory = (BeanFactory) context;It can often be useful to split up container definitions into multiple XML files. One way to then load an application context which is configured from all these XML fragments is to use the application context constructor which takes multiple Resource locations. With a bean factory, a bean definition reader can be used multiple times to read definitions from each file in turn.
Generally, the Spring team prefers the above approach, since it keeps container configuration files unaware of the fact that they are being combined with others. An alternate approach is to use one or more occurrences of the <import/> element to load bean definitions from another file (or files). Any <import/> elements must be placed before <bean/> elements in the file doing the importing. Let's look at a sample:
<beans>

    <import resource="services.xml"/>
    <import resource="resources/messageSource.xml"/>
    <import resource="/resources/themeSource.xml"/>

    <bean id="bean1" class="..."/>
    <bean id="bean2" class="..."/>

</beans>
In this example, external bean definitions are being loaded from 3 files, services.xml, messageSource.xml, and themeSource.xml. All location paths are considered relative to the definition file doing the importing, so services.xml in this case must be in the same directory or classpath location as the file doing the importing, while messageSource.xml and themeSource.xml must be in a resources location below the location of the importing file. As you can see, a leading slash is actually ignored, but given that these are considered relative paths, it is probably better form not to use the slash at all.
The contents of the files being imported must be fully valid XML bean definition files according to the Schema or DTD, including the top level <beans/> element.
As mentioned previously, a Spring IoC container manages one or more beans. These beans are created using the instructions defined in the configuration metadata that has been supplied to the container (typically in the form of XML <bean/> definitions).
Within the container itself, these bean definitions are represented as BeanDefinition objects, which contain (among other information) the following metadata:
a package-qualified class name: this is normally the actual implementation class of the bean being defined. However, if the bean is to be instantiated by invoking a static factory method instead of using a normal constructor, this will actually be the class name of the factory class.
bean behavioral configuration elements, which state how the bean should behave in the container (i.e. prototype or singleton, autowiring mode, dependency checking mode, initialization and destruction methods)
constructor arguments and property values to set in the newly created bean. An example would be the number of connections to use in a bean that manages a connection pool (either specified as a property or as a constructor argument), or the pool size limit.
other beans which are needed for the bean to do its work, i.e. collaborators (also called dependencies).
The concepts listed above directly translate to a set of properties that each bean definition consists of. Some of these properties are listed below, along with a link to further documentation about each of them.
Table 3.1. The bean definition
| Feature | Explained in... |
|---|---|
| class | |
| name | |
| scope | |
| constructor arguments | |
| properties | |
| autowiring mode | |
| dependency checking mode | |
| lazy-initialization mode | |
| initialization method | |
| destruction method |
Besides bean definitions which contain information on how to create a specific bean, certain BeanFactory implementations also permit the registration of existing objects that have been created outside the factory (by user code). The DefaultListableBeanFactory class supports this through the registerSingleton(..) method. Typical applications solely work with beans defined through metadata bean definitions, though.
Every bean has one or more ids (also called identifiers, or names; these terms refer to the same thing). These ids must be unique within the container the bean is hosted in. A bean will almost always have only one id, but if a bean has more than one id, the extra ones can essentially be considered aliases.
When using XML-based configuration metadata, you use the 'id' or 'name' attributes to specify the bean identifier(s). The 'id' attribute allows you to specify exactly one id, and as it is a real XML element ID attribute, the XML parser is able to do some extra validation when other elements reference the id; as such, it is the preferred way to specify a bean id. However, the XML specification does limit the characters which are legal in XML IDs. This is usually not a constraint, but if you have a need to use one of these special XML characters, or want to introduce other aliases to the bean, you may also or instead specify one or more bean ids, separated by a comma (,), semicolon (;), or whitespace in the 'name' attribute.
Please note that you are not required to supply a name for a bean. If no name is supplied explicitly, the container will generate a (unique) name for that bean. The motivations for not supplying a name for a bean will be discussed later (one use case is inner beans).
In a bean definition itself, you may supply more than one name for the bean, by using a combination of up to one name specified via the id attribute, and any number of other names via the name attribute. All these names can be considered equivalent aliases to the same bean, and are useful for some situations, such as allowing each component used in an application to refer to a common dependency using a bean name that is specific to that component itself.
Having to specify all aliases when the bean is actually defined is not always adequate however. It is sometimes desirable to introduce an alias for a bean which is defined elsewhere. In XML-based configuration metadata this may be accomplished via the use of the standalone <alias/> element. For example:
<alias name="fromName" alias="toName"/>
In this case, a bean in the same container which is named 'fromName', may also after the use of this alias definition, be referred to as 'toName'.
As a concrete example, consider the case where component A defines a DataSource bean called componentA-dataSource, in its XML fragment. Component B would however like to refer to the DataSource as componentB-dataSource in its XML fragment. And the main application, MyApp, defines its own XML fragment and assembles the final application context from all three fragments, and would like to refer to the DataSource as myApp-dataSource. This scenario can be easily handled by adding to the MyApp XML fragment the following standalone aliases:
<alias name="componentA-dataSource" alias="componentB-dataSource"/>
<alias name="componentA-dataSource" alias="myApp-dataSource" />
Now each component and the main app can refer to the dataSource via a name that is unique and guaranteed not to clash with any other definition (effectively there is a namespace), yet they refer to the same bean.
So far as a Spring IoC container is concerned, a bean definition is basically a recipe for creating one or more actual objects. The container looks at the recipe for a named bean when asked, and uses the configuration metadata encapsulated by that bean definition to go off and reflectively create an actual object. This section is thus concerned with communicating to you, the application developer, how you inform a Spring IoC container both what type (or class) of object to instantiate and how to instantiate the resulting object.
If you are using XML-based configuration metadata, you can specify the type (or class) of object that is to be instantiated using the 'class' attribute of the <bean/> element. This 'class' attribute (which internally eventually boils down to being a Class property on a BeanDefinition instance) is normally mandatory (see Section 3.2.3.2.3, “Instantiation using an instance factory method” and Section 3.6, “Bean definition inheritance” for the two exceptions) and is used for one of two purposes. The class property specifies the class of the bean to be constructed in the much more common case where the container itself directly creates the bean by calling its constructor reflectively (somewhat equivalent to Java code using the 'new' operator). In the less common case where the container invokes a static, factory method on a class to create the bean, the class property specifies the actual class containing the static factory method that is to be invoked to create the object (the type of the object returned from the invocation of the static factory method may be the same class or another class entirely, it doesn't matter).
When creating a bean using the constructor approach, all normal classes are usable by and compatible with Spring. That is, the class being created does not need to implement any specific interfaces or be coded in a specific fashion. Just specifying the bean class should be enough. However, depending on what type of IoC you are going to use for that specific bean, you may need a default (empty) constructor.
Additionally, the Spring IoC container isn't limited to just managing true JavaBeans, it is also able to manage virtually any class you want it to manage. Most people using Spring prefer to have actual JavaBeans (having just a default (no-argument) constructor and appropriate setters and getters modeled after the properties) in the container, but it is also possible to have more exotic non-bean-style classes in your container. If, for example, you need to use a legacy connection pool that absolutely does not adhere to the JavaBean specification, Spring can manage it as well.
When using XML-based configuration metadata you can specify your bean class like so:
<bean id="exampleBean" class="examples.ExampleBean"/>

<bean name="anotherExample" class="examples.ExampleBeanTwo"/>
The mechanism for supplying arguments to the constructor (if required), or setting properties of the object instance after it has been constructed, will be described shortly.
When defining a bean which is to be created using a static factory method, along with the class attribute which specifies the class containing the static factory method, another attribute named factory-method is needed to specify the name of the factory method itself. Spring expects to be able to call this method (with an optional list of arguments as described later) and get back a live object, which from that point on is treated as if it had been created normally via a constructor. One use for such a bean definition is to call static factories in legacy code.
The following example shows a bean definition which specifies that the bean is to be created by calling a factory-method. Note that the definition does not specify the type (class) of the returned object, only the class containing the factory method. In this example, the createInstance() method must be a static method.
<bean id="exampleBean"
      class="examples.ExampleBean2"
      factory-method="createInstance"/>
The mechanism for supplying (optional) arguments to the factory method, or setting properties of the object instance after it has been returned from the factory, will be described shortly.
In a fashion similar to instantiation via a static factory method, instantiation using an instance factory method is where the factory method of an existing bean from the container is invoked to create the new bean.
To use this mechanism, the 'class' attribute must be left empty, and the 'factory-bean' attribute must specify the name of a bean in the current (or parent/ancestor) container that contains the factory method. The factory method itself must still be set via the 'factory-method' attribute (as seen in the example below).
<!-- the factory bean, which contains a method called createInstance() -->
<bean id="myFactoryBean" class="...">
  ...
</bean>

<!-- the bean to be created via the factory bean -->
<bean id="exampleBean"
      factory-bean="myFactoryBean"
      factory-method="createInstance"/>
Although the mechanisms for setting bean properties are still to be discussed, one implication of this approach is that the factory bean itself can be managed and configured via DI.
A BeanFactory is essentially nothing more than the interface for an advanced factory capable of maintaining a registry of different beans and their dependencies. The BeanFactory enables you to read bean definitions and access them using the bean factory. When using just the BeanFactory you would create one and read in some bean definitions in the XML format as follows:
InputStream is = new FileInputStream("beans.xml");
BeanFactory factory = new XmlBeanFactory(is);
Basically that's all there is to it. Using getBean(String) you can retrieve instances of your beans; the client-side view of the BeanFactory is surprisingly simple. The BeanFactory interface has only six methods for client code to call:
boolean containsBean(String): returns true if the BeanFactory contains a bean definition or bean instance that matches the given name
Object getBean(String): returns an instance of the bean registered under the given name. Depending on how the bean was configured by the BeanFactory configuration, either a singleton and thus shared instance or a newly created bean will be returned. A BeansException will be thrown when either the bean could not be found (in which case it'll be a NoSuchBeanDefinitionException), or an exception occurred while instantiating and preparing the bean
Object getBean(String, Class): returns a bean, registered under the given name. The bean returned will be cast to the given Class. If the bean could not be cast, corresponding exceptions will be thrown (BeanNotOfRequiredTypeException). Furthermore, all rules of the getBean(String) method apply (see above)
Class getType(String name): returns the Class of the bean with the given name. If no bean corresponding to the given name could be found, a NoSuchBeanDefinitionException will be thrown
boolean isSingleton(String): determines whether or not the bean definition or bean instance registered under the given name is a singleton (bean scopes such as singleton are explained later). If no bean corresponding to the given name could be found, a NoSuchBeanDefinitionException will be thrown
String[] getAliases(String): Return the aliases for the given bean name, if any were defined in the bean definition
Your typical enterprise application is not made up of a single object (or bean in the Spring parlance). Even the simplest of applications will no doubt have at least a handful of objects that work together to present what the end-user sees as a coherent application. This next section explains how you go from defining a number of bean definitions that stand-alone, each to themselves, to a fully realized application where objects work (or collaborate) together to achieve some goal (usually an application that does what the end-user wants).
The basic principle behind Dependency Injection (DI) is that objects define their dependencies (i.e. the other objects they work with) only through constructor arguments, arguments to a factory method, or properties which are set on the object instance after it has been constructed or returned from a factory method. Then, it is the job of the container to actually inject those dependencies when it creates the bean. This is fundamentally the inverse, hence the name Inversion of Control (IoC), of the bean itself being in control of instantiating or locating its dependencies on its own using direct construction of classes, or something like the Service Locator pattern.
It becomes evident upon usage that code gets much cleaner when the DI principle is applied, and reaching a higher grade of decoupling is much easier when beans do not look up their dependencies, but are provided with them (and additionally do not even know where the dependencies are located and of what actual class they are).
As touched on in the previous paragraph, DI exists in two major variants, namely Setter Injection, and Constructor Injection.
Setter-based DI is realized by calling setter methods on your beans after invoking a no-argument constructor or no-argument static factory method to instantiate your bean.
Find below an example of a class that can only be dependency injected using pure setter injection. Note that there is nothing special about this class... it is plain old Java.
public class SimpleMovieLister {

    // the SimpleMovieLister has a dependency on the MovieFinder
    private MovieFinder movieFinder;

    // a setter method so that the Spring container can 'inject' a MovieFinder
    public void setMovieFinder(MovieFinder movieFinder) {
        this.movieFinder = movieFinder;
    }

    // business logic that actually 'uses' the injected MovieFinder is omitted...
}Constructor-based DI is realized by invoking a constructor with a number of arguments, each representing a collaborator. Additionally, calling a static factory method with specific arguments to construct the bean, can be considered almost equivalent, and the rest of this text will consider arguments to a constructor and arguments to a static factory method similarly.
Find below an example of a class that could only be dependency injected using constructor injection. Again, note that there is nothing special about this class.
public class SimpleMovieLister {

    // the SimpleMovieLister has a dependency on the MovieFinder
    private MovieFinder movieFinder;

    // a constructor so that the Spring container can 'inject' a  MovieFinder
    public SimpleMovieLister(MovieFinder movieFinder) {
        this.movieFinder = movieFinder;
    }

    // business logic that actually 'uses' the injected MovieFinder is omitted...
}The BeanFactory supports both of these variants for injecting dependencies into beans it manages. (It in fact also supports injecting setter-based dependencies after some dependencies have already been supplied via the constructor approach.) The configuration for the dependencies comes in the form of a BeanDefinition, which is used together with PropertyEditor instances to know how to convert properties from one format to another. However, most users of Spring will not be dealing with these classes directly (i.e. programmatically), but rather with an XML definition file which will be converted internally into instances of these classes, and used to load an entire Spring IoC container instance.
Bean dependency resolution generally happens as follows:
The BeanFactory is created and initialized with a configuration which describes all the beans. (Most Spring users use a BeanFactory or ApplicationContext implementation that supports XML format configuration files.)
Each bean has dependencies expressed in the form of properties, constructor arguments, or arguments to the static-factory method when that is used instead of a normal constructor. These dependencies will be provided to the bean, when the bean is actually created.
Each property or constructor argument is either an actual definition of the value to set, or a reference to another bean in the container.
Each property or constructor argument which is a value must be able to be converted from whatever format it was specified in, to the actual type of that property or constructor argument. By default Spring can convert a value supplied in string format to all built-in types, such as int, long, String, boolean, etc.
It is important to realize that Spring validates the configuration of each bean in a container as the container is created, including the validation that properties which are bean references are actually referring to valid beans (i.e. the beans being referred to are also defined in the container. However, the bean properties themselves are not set until the bean is actually created. For that which are singleton-scoped and set to be pre-instantiated (such as singleton beans in an ApplicationContext), creation happens at the time that the container is created, but otherwise this is only when the bean is requested. When a bean actually has to be created, this will potentially cause a graph of other beans to be created, as its dependencies and its dependencies' dependencies (and so on) are created and assigned.
You can generally trust Spring to do the right thing. It will detect mis-configuration issues, such as references to non-existent beans and circular dependencies, at container load-time. It will actually set properties and resolve dependencies (i.e. create those dependencies if needed) as late as possible, which is when the bean is actually created. This means that a Spring container which has loaded correctly can later generate an exception when you request a bean if there is a problem creating that bean or one of its dependencies. This could happen if the bean throws an exception as a result of a missing or invalid property, for example. This potentially delayed visibility of some configuration issues is why ApplicationContext implementations by default pre-instantiate singleton beans. At the cost of some upfront time and memory to create these beans before they are actually needed, you find out about configuration issues when the ApplicationContext is created, not later. If you wish, you can still override this default behavior and set any of these singleton beans to lazy-initialize (i.e. not be pre-instantiated).
Finally, if it is not immediately apparent, it is worth mentioning that when one or more collaborating beans are being injected into a dependent bean, each collaborating bean is totally configured prior to being passed (via one of the DI flavors) to the dependent bean. This means that if bean A has a dependency on bean B, the Spring IoC container will totally configure bean B prior to invoking the setter method on bean A; you can read 'totally configure' to mean that the bean will be instantiated (if not a pre-instantiated singleton), all of its dependencies will be set, and the relevant lifecycle methods (such as a configured init method or the IntializingBean callback method) will all be invoked.
First, an example of using XML-based configuration metadata for setter-based DI. Find below a small part of a Spring XML configuration file specifying some bean definitions.
<bean id="exampleBean" class="examples.ExampleBean">

  <!-- setter injection using the nested <ref/> element -->
  <property name="beanOne"><ref bean="anotherExampleBean"/></property>

  <!-- setter injection using the neater 'ref' attribute -->
  <property name="beanTwo" ref="yetAnotherBean"/>
  <property name="integerProperty" value="1"/>
</bean>

<bean id="anotherExampleBean" class="examples.AnotherBean"/>
<bean id="yetAnotherBean" class="examples.YetAnotherBean"/>
public class ExampleBean {

    private AnotherBean beanOne;
    private YetAnotherBean beanTwo;
    private int i;

    public void setBeanOne(AnotherBean beanOne) {
        this.beanOne = beanOne;
    }

    public void setBeanTwo(YetAnotherBean beanTwo) {
        this.beanTwo = beanTwo;
    }

    public void setIntegerProperty(int i) {
        this.i = i;
    }
}
As you can see, setters have been declared to match against the properties specified in the XML file.
Now, an example of using constructor-based DI. Find below a snippet from an XML configuration that specifies constructor arguments, and the corresponding Java class.
<bean id="exampleBean" class="examples.ExampleBean">

  <!-- constructor injection using the nested <ref/> element -->
  <constructor-arg><ref bean="anotherExampleBean"/></constructor-arg>

  <!-- constructor injection using the neater 'ref' attribute -->
  <constructor-arg ref="yetAnotherBean"/>

  <constructor-arg type="int" value="1"/>
</bean>

<bean id="anotherExampleBean" class="examples.AnotherBean"/>
<bean id="yetAnotherBean" class="examples.YetAnotherBean"/>
public class ExampleBean {

    private AnotherBean beanOne;
    private YetAnotherBean beanTwo;
    private int i;

    public ExampleBean(
        AnotherBean anotherBean, YetAnotherBean yetAnotherBean, int i) {
        this.beanOne = anotherBean;
        this.beanTwo = yetAnotherBean;
        this.i = i;
    }
}
As you can see, the constructor arguments specified in the bean definition will be used to pass in as arguments to the constructor of the ExampleBean.
Now consider a variant of this where instead of using a constructor, Spring is told to call a static factory method to return an instance of the object:
<bean id="exampleBean" class="examples.ExampleBean"
      factory-method="createInstance">
  <constructor-arg ref="anotherExampleBean"/>
  <constructor-arg ref="yetAnotherBean"/>
  <constructor-arg value="1"/>
</bean>

<bean id="anotherExampleBean" class="examples.AnotherBean"/>
<bean id="yetAnotherBean" class="examples.YetAnotherBean"/>
public class ExampleBean {
// a private constructor
private ExampleBean(...) {
...
}
// a static factory method; the arguments to this method can be
// considered the dependencies of the bean that is returned,
// regardless of how those arguments are actually used.
public static ExampleBean createInstance (
AnotherBean anotherBean, YetAnotherBean yetAnotherBean, int i) {
ExampleBean eb = new ExampleBean (...);
// some other operations
...
return eb;
}
}Note that arguments to the static factory method are supplied via constructor-arg elements, exactly the same as if a constructor had actually been used. Also, it is important to realize that the type of the class being returned by the factory method does not have to be of the same type as the class which contains the static factory method, although in this example it is. An instance (non-static) factory method would be used in an essentially identical fashion (aside from the use of the factory-bean attribute instead of the class attribute), so details will not be discussed here.
Constructor argument resolution matching occurs using the argument's type. If there is no potential for ambiguity in the constructor arguments of a bean definition, then the order in which the constructor arguments are defined in a bean definition is the order in which those arguments will be supplied to the appropriate constructor when it is being instantiated. Consider the following class...
package x.y;

public class Foo {

    public Foo(Bar bar, Baz baz) {
        // ...
    }
}
There is no potential for ambiguity here (assuming of course that Bar and Baz classes are not related in an inheritance hierarchy). Thus the following configuration will work just fine, and you do not need to specify the constructor argument indexes and / or types explicitly... it just plain works as you would expect it to.
<beans>
    <bean name="foo" class="x.y.Foo">
        <constructor-arg>
            <bean class="x.y.Bar"/>
        </constructor-arg>
        <constructor-arg>
            <bean class="x.y.Baz"/>
        </constructor-arg>
    </bean>
</beans>
When another bean is referenced, the type is known, and matching can occur (as was the case with the preceding example). When a simple type is used, such as <value>true<value>, Spring cannot determine the type of the value, and so cannot match by type without help. Consider the following class, which is used for the following two sections:
package examples;

public class ExampleBean {

    // No. of years to the calculate the Ultimate Answer
    private int years;

    // The Answer to Life, the Universe, and Everything
    private String ultimateAnswer;

    public ExampleBean(int years, String ultimateAnswer) {
        this.years = years;
        this.ultimateAnswer = ultimateAnswer;
    }
}The above scenario can use type matching with simple types by explicitly specifying the type of the constructor argument using the 'type' attribute. For example:
<bean id="exampleBean" class="examples.ExampleBean">
  <constructor-arg type="int" value="7500000"/>
  <constructor-arg type="java.lang.String" value="42"/>
</bean>
Constructor arguments can have their index specified explicitly by use of the index attribute. For example:
<bean id="exampleBean" class="examples.ExampleBean">
  <constructor-arg index="0" value="7500000"/>
  <constructor-arg index="1" value="42"/>
</bean>
As well as solving the ambiguity problem of multiple simple values, specifying an index also solves the problem of ambiguity where a constructor may have two arguments of the same type. Note that the index is 0 based.
![[Tip]](../images/admons/tip.png) | Tip |
|---|---|
Specifying a constructor argument index is the preferred way of performing constructor IoC. | |
As mentioned in the previous section, bean properties and constructor arguments can be defined as either references to other managed beans (collaborators), or values defined inline. Spring's XML-based configuration metadata supports a number of sub-element types within its <property/> and <constructor-arg/> elements for just this purpose.
The <value/> element specifies a property or constructor argument as a human-readable string representation. As mentioned previously, JavaBeans PropertyEditors are used to convert these string values from a String to the actual type of the property or argument.
<bean id="myDataSource" class="org.apache.commons.dbcp.BasicDataSource" destroy-method="close">

  <!-- results in a setDriverClassName(String) call -->
  <property name="driverClassName">
    <value>com.mysql.jdbc.Driver</value>
  </property>
  <property name="url">
    <value>jdbc:mysql://localhost:3306/mydb</value>
  </property>
  <property name="username">
    <value>root</value>
  </property>
  <property name="password">
    <value>masterkaoli</value>
  </property>
</bean>
The <property/> and <constructor-arg/> elements also support the use of the 'value' attribute, which can lead to much more succinct configuration. When using the 'value' attribute, the above bean definition reads like so:
<bean id="myDataSource" class="org.apache.commons.dbcp.BasicDataSource" destroy-method="close">

  <!-- results in a setDriverClassName(String) call -->
  <property name="driverClassName" value="com.mysql.jdbc.Driver"/>
  <property name="url" value="jdbc:mysql://localhost:3306/mydb"/>
  <property name="username" value="root"/>
  <property name="password" value="masterkaoli"/>
</bean>
The Spring team generally prefer the attribute style over the use of nested <value/> elements. If you are reading this reference manual straight through from top to bottom (wow!) then we are getting slightly ahead of ourselves here, but did you know that you can specify a java.util.Properties instance like this?
<bean id="mappings" class="org.springframework.beans.factory.config.PropertyPlaceholderConfigurer">

   <!-- typed as a java.util.Properties -->
   <property name="properties">
      <value>
         jdbc.driver.className=com.mysql.jdbc.Driver
         jdbc.url=jdbc:mysql://localhost:3306/mydb
      </value>
   </property>
</bean>
Can you see what is happening? The Spring container is converting the text inside the <value/> element into a java.util.Properties instance using the JavaBeans PropertEditor mechanism. This is a nice shortcut, and is one of a few places where the Spring team do favor the use of the nested <value/> element over the 'value' attribute style.
The idref element is simply an error-proof way to pass the id of another bean in the container (to a <constructor-arg/> or <property/> element).
<bean id="theTargetBean" class="..."/>

<bean id="theClientBean" class="...">
    <property name="targetName">
        <idref bean="theTargetBean" />
    </property>
</bean>
The above bean definition snippet is exactly equivalent (at runtime) to the following snippet:
<bean id="theTargetBean" class="..."/>

<bean id="client" class="...">
    <property name="targetName">
        <value>theTargetBean</value>
    </property>
</bean>
The main reason the first form is preferable to the second is that using the idref tag allows the container to validate at deployment time that the referenced, named bean actually exists. In the second variation, no validation is performed on the value that is passed to the 'targetName' property of the 'client' bean. Any typo will only be discovered (with most likely fatal results) when the 'client' bean is actually instantiated. If the 'client' bean is a prototype bean, this typo (and the resulting exception) may only be discovered long after the container is actually deployed.
Additionally, if the bean being referred to is in the same XML unit, and the bean name is the bean id, the 'local' attribute may be used, which allows the XML parser itself to validate the bean id even earlier, at XML document parse time.
<property name="targetName">
   <!-- a bean with an id of 'theTargetBean' must exist,
                otherwise an XML exception will be thrown -->
   <idref local="theTargetBean"/>
</property>
By way of an example, one common place (at least in pre-Spring 2.0 configuration) where the <idref/> element brings value is in the configuration of AOP interceptors in a ProxyFactoryBean bean definition. If you use <idref/> elements when specifying the interceptor names, there is no chance of inadvertently misspelling an interceptor id.
The ref element is the final element allowed inside a <constructor-arg/> or <property/> definition element. It is used to set the value of the specified property to be a reference to another bean managed by the container (a collaborator). As mentioned in a previous section, the referred-to bean is considered to be a dependency of the bean who's property is being set, and will be initialized on demand as needed (if it is a singleton bean it may have already been initialized by the container) before the property is set. All references are ultimately just a reference to another object, but there are 3 variations on how the id/name of the other object may be specified, which determines how scoping and validation is handled.
Specifying the target bean by using the bean attribute of the <ref/> tag is the most general form, and will allow creating a reference to any bean in the same container (whether or not in the same XML file), or parent container. The value of the 'bean' attribute may be the same as either the 'id' attribute of the target bean, or one of the values in the 'name' attribute of the target bean.
<ref bean="someBean"/>
Specifying the target bean by using the local attribute leverages the ability of the XML parser to validate XML id references within the same file. The value of the local attribute must be the same as the id attribute of the target bean. The XML parser will issue an error if no matching element is found in the same file. As such, using the local variant is the best choice (in order to know about errors are early as possible) if the target bean is in the same XML file.
<ref local="someBean"/>
Specifying the target bean by using the 'parent' attribute allows a reference to be created to a bean which is in a parent container of the current container. The value of the 'parent' attribute may be the same as either the 'id' attribute of the target bean, or one of the values in the 'name' attribute of the target bean, and the target bean must be in a parent container to the current one. The main use of this bean reference variant is when you have a hierarchy of containers and you want to wrap an existing bean in a parent container with some sort of proxy which will have the same name as the parent bean (i.e. the bean definition in the child context is overriding the parent bean).
<!-- in the parent context -->
<bean id="accountService" class="com.foo.SimpleAccountService">
    <!-- insert dependencies as required as here -->
</bean>
<!-- in the child (descendant) context -->
<bean id="accountService"  <-- notice that the name of this bean is the same as the name of the 'parent' bean
      class="org.springframework.aop.framework.ProxyFactoryBean">
      <property name="target">
          <ref parent="accountService"/>  <-- notice how we refer to the parent bean
      </property>
    <!-- insert other configuration and dependencies as required as here -->
</bean>
(In all honesty the usage of the 'parent' attribute is not at all common.)
A <bean/> element inside the <property/> or <constructor-arg/> elements is used to define a so-called inner bean. An inner bean definition does not need to have any id or name defined, and it is best not to even specify any id or name value because the id or name value simply will be ignored by the container.
Find below an example of an inner bean.
<bean id="outer" class="...">
  <!-- instead of using a reference to a target bean, simply define the target bean inline -->
  <property name="target">
    <bean class="com.mycompany.Person"> <!-- this is the inner bean -->
      <property name="name" value="Fiona Apple"/>
      <property name="age" value="25"/>
    </bean>
  </property>
</bean>
Note that in the specific case of inner beans, the 'singleton' flag and any 'id' or 'name' attribute are effectively ignored. Inner beans are always anonymous and they are always scoped as prototypes. Please also note that it is not possible to inject inner beans into collaborating beans other than the enclosing bean.
The <list/>, <set/>, <map/>, and <props/> elements allow properties and arguments of the Java Collection type List, Set, Map, and Properties, respectively, to be defined and set.
<bean id="moreComplexObject" class="example.ComplexObject">
  <!-- results in a setAdminEmails(java.util.Properties) call -->
  <property name="adminEmails">
    <props>
        <prop key="administrator">[email protected]</prop>
        <prop key="support">[email protected]</prop>
        <prop key="development">[email protected]</prop>
    </props>
  </property>
  <!-- results in a setSomeList(java.util.List) call -->
  <property name="someList">
    <list>
        <value>a list element followed by a reference</value>
        <ref bean="myDataSource" />
    </list>
  </property>
  <!-- results in a setSomeMap(java.util.Map) call -->
  <property name="someMap">
    <map>
        <entry>
            <key>
                <value>yup an entry</value>
            </key>
            <value>just some string</value>
        </entry>
        <entry>
            <key>
                <value>yup a ref</value>
            </key>
            <ref bean="myDataSource" />
        </entry>
    </map>
  </property>
  <!-- results in a setSomeSet(java.util.Set) call -->
  <property name="someSet">
    <set>
        <value>just some string</value>
        <ref bean="myDataSource" />
    </set>
  </property>
</bean>
Note that the value of a map key or value, or a set value, can also again be any of the following elements:
bean | ref | idref | list | set | map | props | value | null
As of Spring 2.0, the container also supports the merging of collections. This allows an application developer to define a parent-style <list/>, <map/>, <set/> or <props/> element, and have child-style <list/>, <map/>, <set/> or <props/> elements inherit and override values from the parent collection; i.e. the child collection's values will be the result obtained from the merging of the elements of the parent and child collections, with the child's collection elements overriding values specified in the parent collection.
Please note that this section on merging makes use of the parent-child bean mechanism. This concept has not yet been introduced, so readers unfamiliar with the concept of parent and child bean definitions may wish to read the corresponding section before continuing (see the section entitled Section 3.6, “Bean definition inheritance”).
An example would perhaps serve best to illustrate this feature:
<beans>
<bean id="parent" abstract="true" class="example.ComplexObject">
    <property name="adminEmails">
        <props>
            <prop key="administrator">[email protected]</prop>
            <prop key="support">[email protected]</prop>
        </props>
    </property>
</bean>
<bean id="child" parent="parent">
    <property name="adminEmails">
        <!-- the merge is specified on the *child* collection definition -->
        <props merge="true">
            <prop key="sales">[email protected]</prop>
            <prop key="support">[email protected]</prop>
        </props>
    </property>
</bean>
<beans>
Notice the use of the merge=true attribute on the <props/> element of the adminEmails property of the child bean definition. When the child bean is actually resolved and instantiated by the container, the resulting instance will have an adminEmails Properties collection that contains the result of the merging of the child's adminEmails collection with the parent's adminEmails collection.
[email protected]
[email protected]
[email protected]
Notice how the child Properties collection's value set will have inherited all the property elements from the parent <props/>. Notice also how the child's value for the support value overrides the value in the parent collection.
This merging behavior applies similarly to the <list/>, <map/>, and <set/> collection types. In the specific case of the <list/> element, the semantics associated with the List collection type, i.e. the notion of an ordered collection of values, is maintained; the parent's values will precede all of the child list's values. In the case of the Map, Set, and Properties collection types, there is no notion of ordering and hence no ordering semantics are in effect for the collection types that underlie the associated Map, Set and Properties implementation types used internally by the container.
Finally, some minor notes about the merging support are in order; you cannot merge different collection types (e.g. a Map and a List), and if you do attempt to do so an appropriate Exception will be thrown; and in case it is not immediately obvious, the 'merge' attribute must be specified on the lower level, inherited, child definition; specifying the 'merge' attribute on a parent collection definition is redundant and will not result in the desired merging; and (lastly), please note that this merging feature is only available in Spring 2.0 (and later versions).
If you are one of the lucky few to be using Java5 (Tiger), you will be aware that it is possible to have strongly typed collections. That is, it is possible to declare a Collection type such that it can only contain String elements (for example).
If you are using Spring to dependency inject a strongly-typed Collection into a bean, you can take advantage of Spring's type-conversion support such that the elements of your strongly-typed Collection instances will be converted to the appropriate type prior to being added to the Collection.
Consider the following example::
public class Foo {

    private Map<String, Float> accounts;

    public void setAccounts(Map<String, Float> accounts) {
        this.accounts = accounts;
    }
}
<beans>
<bean id="foo" class="x.y.Foo">
<property name="accounts">
<map>
<entry key="one" value="9.99"/>
<entry key="two" value="2.75"/>
<entry key="six" value="3.99"/>
</map>
</property>
</bean>
</beans>When the 'accounts' property of the 'foo' bean is being prepared for injection, the generics information about the element type of the strongly-typed Map<String, Float> is actually available via reflection, and so Spring's type conversion infrastructure will actually recognize the various value elements as being of type Float and so the string values '9.99', '2.75', and '3.99' will be converted into an actual Float type.
The <null/> element is used to handle null values. Spring treats empty arguments for properties and the like as empty Strings. The following XML-based configuration metadata snippet results in the email property being set to the empty String value ("")
<bean class="ExampleBean">
  <property name="email"><value></value></property>
</bean>
This is equivalent to the following Java code: exampleBean.setEmail(""). The special <null> element may be used to indicate a null value. For example:
<bean class="ExampleBean">
  <property name="email"><null/></property>
</bean>
The above configuration is equivalent to the following Java code: exampleBean.setEmail(null).
The configuration metadata that you saw above in some places is a little verbose. That's why there are several options available for you to limit the amount of XML you have to write to configure your components a little bit. The first is a shortcut to define values and references to other beans as part of a <property/> definition. The second is slightly different format of specifying properties all together.
There exist some shortcut forms which are less verbose than using the full <value/> and <ref/> elements. The <property/>, <constructor-arg/>, and <entry/> elements all support a 'value' attribute which may be used instead of embedding a full <value/> element. Therefore, the following:
<property name="myProperty">
  <value>hello</value>
</property>
<constructor-arg>
  <value>hello</value>
</constructor-arg>
<entry key="myKey">
  <value>hello</value>
</entry>
are equivalent to:
<property name="myProperty" value="hello"/>
<constructor-arg value="hello"/>
<entry key="myKey" value="hello"/>
In general, when typing definitions by hand, you will probably prefer to use the less verbose shortcut form (the Spring team certainly does).
The <property/> and <constructor-arg/> elements support a similar shortcut 'ref' attribute which may be used instead of a full nested <ref/> element. Therefore, the following:
<property name="myProperty">
  <ref bean="myBean">
</property>
<constructor-arg>
  <ref bean="myBean">
</constructor-arg>
... are equivalent to:
<property name="myProperty" ref="myBean"/>
<constructor-arg ref="myBean"/>
Note however that the shortcut form is equivalent to a <ref bean="xxx"> element; there is no shortcut for <ref local="xxx">. To enforce a strict local reference, you must use the long form.
Finally, the entry element allows a shortcut form to specify the key and/or value of the map, in the form of the 'key' / 'key-ref' and 'value' / 'value-ref' attributes. Therefore, the following:
<entry>
  <key>
    <ref bean="myKeyBean" />
  </key>
  <ref bean="myValueBean" />
</entry>
is equivalent to:
<entry key-ref="myKeyBean" value-ref="myValueBean"/>
Again, the shortcut form is equivalent to a <ref bean="xxx"> element; there is no shortcut for <ref local="xxx">.
The second option you have to limit the amount of XML you have to write to configure your components is to use the so-called p-namespace. As you might know, Spring 2.0 and later features support for extensible configuration formats using namespaces. Those namespaces (such as util and jee) are all based on an XML Schema definition. In fact, the beans configuration format that you've been reading about is just as much defined in an XML Schema document.
One namespace however is not defined in an XSD file and only exists in the core of Spring itself. The so-called p-namespace doesn't need a schema definition and is a powerful way of configuring your properties differently than the way you've seen so far. Instead of using nested property elements, using the p-namespace you can use attributes (in the p-namespace) as part of the bean element that describe your property values. The values of the attributes will be taken as values for your properties.
Let's review an example. The following two XML snippets are (in terms of Spring configuration declaratives) entirely the same, except for the fact that the first is using the format you're familiar with (the property elements) whereas the second example is using the p-namespace
<beans xmlns="http://www.springframework.org/schema/beans"
    xmlns:p="http://www.springframework.org/schema/p"
    xmlns:xsi="http://www.w3.org/2001/XMLSchema-instance"
    xsi:schemaLocation="http://www.springframework.org/schema/beans/spring-beans-2.0.xsd">

    <bean name="classic" class="com.mycompany.ExampleBean">
        <property name="email" value="[email protected]/>
    </bean>

    <bean name="p-namespace"
        class="com.mycompany.ExampleBean"
        p:email="[email protected]"/>
</beans>
As you can see, we're including a attribute from the p-namespace called email in the bean definition. This is telling Spring that it should include a property declaration. As previously mentioned, the p-namespace doesn't have a schema definition, so the name of the attribute can be set to whatever name your property has.
The second exampe (see below) included two more bean definitions that both have a reference to another bean:
<beans xmlns="http://www.springframework.org/schema/beans"
    xmlns:p="http://www.springframework.org/schema/p"
    xmlns:xsi="http://www.w3.org/2001/XMLSchema-instance"
    xsi:schemaLocation="http://www.springframework.org/schema/beans/spring-beans-2.0.xsd">

    <bean name="john-classic" class="com.mycompany.Person">
        <property name="name" value="John Doe"/>
        <property name="spouse" ref="jane"/>
    </bean>

	<bean name="john-modern"
		class="com.mycompany.Person"
		p:name="John Doe"
		p:spouse-ref="jane"/>

    <bean name="jane" class="com.mycompany.Person">
        <property name="name" value="Jane Doe"/>
    </bean>
</beans>
As you can see, this example doesn't only include a property value using the p-namespace, but also uses a special format to declare property references. Whereas the first bean definition uses <property name="spouse" ref="jane"/> to create a reference from bean john to bean jane, the second bean definition uses op:spouse-ref="jane" as an attribute to do the exact same thing. In this case spouse is the property name whereas the -ref part tells Spring this is not a value but a bean reference.
| Note |
|---|---|
Note that we recommend you to choose carefully which approach you are going to use in your project. You should also communicate this to your team members so you won't end up with XML documents using all three approaches at the same time. All this adds to the consistency of your codebase and will prevent people from not understanding the application because of different ways of configurating it. Also not that this functionality is only available as of Spring 2.0. | |
Using the p-namespace requires nothing else than simply adding it to your XML declaration as shown above.
Compound or nested property names are perfectly legal when setting bean properties, as long as all components of the path except the final property name are non-null. For example, in this bean definition:
<bean id="foo" class="foo.Bar">
  <property name="fred.bob.sammy" value="123" />
</bean>
The foo bean has a fred property which has a bob property, which has a sammy property, and that final sammy property is being set to a scalar value of 123. In order for this to work, the fred property of foo, and the bob property of fred must both be non-null after the bean is constructed, or a NullPointerException will be thrown.
For most situations, the fact that a bean is a dependency of another is expressed simply by the fact that one bean is set as a property of another. This is typically accomplished with the <ref/> element in XML-based configuration metadata. In a variation of this, sometimes a bean which is aware of the container is simply given the id of its dependency (using a string value or alternately the <idref/> element, which evaluates the same as a string value). The first bean then programmatically asks the container for its dependency. In either case, the dependency is properly initialized before the dependent bean.
For the relatively infrequent situations where dependencies between beans are less direct (for example, when a static initializer in a class needs to be triggered, such as database driver registration), the 'depends-on' attribute may be used to explicitly force one or more beans to be initialized before the bean using this element is initialized. Find below an example of using the 'depends-on' attribute to express a dependency on a single bean.
<bean id="beanOne" class="ExampleBean" depends-on="manager"/>

<bean id="manager" class="ManagerBean" />
If you need to express a dependency on multiple beans, you can supply a delimited list of bean names as the value of the 'depends-on' attribute, with commas, whitespace and semi-colons all valid delimiters. Find below an example of using 'depends-on' to express a dependency on a number of beans.
<bean id="beanOne" class="ExampleBean" depends-on="manager,accountDao">
  <property name="manager" ref="manager" />
</bean>

<bean id="manager" class="ManagerBean" />
<bean id="accountDao" class="x.y.jdbc.JdbcAccountDao" />
The default behavior for ApplicationContext implementations is to eagerly pre-instantiate all singleton beans at startup. Pre-instantiation means that an ApplicationContext implementation instance will eagerly create and configure all of it's singleton beans as part of its initialization process. This is generally a good thing, because it means that any errors in the configuration or in the surrounding environment will be discovered immediately (as opposed to possibly hours or even days down the line).
However, there are times when this behavior is not what is wanted. If you do not want a singleton bean to be pre-instantiated when using an ApplicationContext implementation, you can (on a bean-definition by bean-definition basis) selectively control this by marking a bean definition as lazy-initialized. A lazily-initialized bean indicates to the IoC container whether or not a bean instance should be created at startup or when it is first requested.
When configuring beans via XML, this lazy loading is controlled by the 'lazy-init' attribute on the <bean/> element; for example:
<bean id="lazy" class="com.foo.ExpensiveToCreateBean" lazy-init="true">
    <!-- various properties here... -->
</bean>

<bean name="not.lazy" class="com.foo.AnotherBean">
    <!-- various properties here... -->
</bean>
When the above configuration is consumed by an ApplicationContext implementation, the bean named 'lazy' will not be eagerly pre-instantiated when the ApplicationContext is starting up, whereas the 'not.lazy' bean will be eagerly pre-instantiated.
One thing to understand about lazy-initialization is that even though a bean definition may be marked up as being lazy-initialized, if the lazy-initialized bean is the dependency of a singleton bean that is not lazy-initialized, when the ApplicationContext is eagerly pre-instantiating the singleton, it will (of course) have to satisfy all of the singletons dependencies, one of which will be the lazy-initialized bean! So don't be confused if the IoC container creates one of the beans that you have explicitly configured as lazy-initialized at startup; all that means is that the lazy-initialized bean probably is being injected into a non-lazy-initialized singleton bean elsewhere in your configuration.
It is also possible to control lazy-initialization at the container level by using the 'default-lazy-init' attribute on the <beans/> element; for example:
<beans default-lazy-init="true">
    <!-- no beans will be eagerly pre-instantiated... -->
</beans>A Spring IoC container is able to autowire relationships between collaborating beans. This means that it is possible to automatically let Spring resolve collaborators (other beans) for your bean by inspecting the contents of the BeanFactory. The autowiring functionality has five modes. Autowiring is specified per bean and can thus be enabled for some beans, while other beans won't be autowired. Using autowiring, it is possible to reduce or eliminate the need to specify properties or constructor arguments, saving a significant amount of typing. [2] When using XML-based configuration metadata, the autowire mode for a bean definition is specified by using the autowire attribute of the <bean/> element. The following values are allowed:
Table 3.2. Autowiring modes
| Mode | Explanation |
|---|---|
| no | No autowiring at all. Bean references must be defined via a ref element. This is the default, and changing this is discouraged for larger deployments, since explicitly specifying collaborators gives greater control and clarity. To some extent, it is a form of documentation about the structure of a system. |
| byName | Autowiring by property name. This option will inspect the container and look for a bean named exactly the same as the property which needs to be autowired. For example, if you have a bean definition which is set to autowire by name, and it contains a master property (that is, it has a setMaster(..) method), Spring will look for a bean definition named master, and use it to set the property. |
| byType | Allows a property to be autowired if there is exactly one bean of the property type in the container. If there is more than one, a fatal exception is thrown, and this indicates that you may not use byType autowiring for that bean. If there are no matching beans, nothing happens; the property is not set. If this is not desirable, setting the dependency-check="objects" attribute value specifies that an error should be thrown in this case. |
| constructor | This is analogous to byType, but applies to constructor arguments. If there isn't exactly one bean of the constructor argument type in the container, a fatal error is raised. |
| autodetect | Chooses constructor or byType through introspection of the bean class. If a default constructor is found, the byType mode will be applied. |
Note that explicit dependencies in property and constructor-arg settings always override autowiring. Please also note that it is not currently possible to autowire so-called simple properties such as primitives, Strings, and Classes (and arrays of such simple properties).(This is by-design and should be considered a feature.) Autowire behavior can be combined with dependency checking, which will be performed after all autowiring has been completed.
It is important to understand the various advantages and disadvantages of autowiring. Some advantages of autowiring include:
Autowiring can significantly reduce the volume of configuration required. However, mechanisms such as the use of a bean template (discussed elsewhere in this chapter) are also valuable in this regard.
Autowiring can cause configuration to keep itself up to date as your objects evolve. For example, if you need to add an additional dependency to a class, that dependency can be satisfied automatically without the need to modify configuration. Thus there may be a strong case for autowiring during development, without ruling out the option of switching to explicit wiring when the code base becomes more stable.
Some disadvantages of autowiring:
Autowiring is more magical than explicit wiring. Although, as noted in the above table, Spring is careful to avoid guessing in case of ambiguity which might have unexpected results, the relationships between your Spring-managed objects is no longer explicitly documented.
Wiring information may not be available to tools that may generate documentation from a Spring container.
Autowiring by type will only work when there is a single bean definition of the type specified by the setter method or constructor argument. You need to use explicit wiring if there is any potential ambiguity.
There is no "wrong" or "right" answer in all cases. A degree of consistency across a project is best though; for example, if autowiring is not used in general, it might be confusing to developers to use it just to wire one or two bean definitions.
You can also (on a per bean basis) totally exclude a bean from being an autowire candidate. When configuring beans using Spring's XML format, the 'autowire-candidate' attribute of the <bean/> element can be set to 'false'; this has the effect of making the container totally exclude that specific bean definition from being available to the autowiring infrastructure.
This can be useful when you have a bean that you absolutely never ever want to have injected into other beans via autowiring. It does not mean that the excluded bean cannot itself be configured using autowiring... it can, it is rather that it itself will not be considered as a candidate for autowiring other beans.
The Spring IoC container also has the ability to try to check for the existence of unresolved dependencies of a bean deployed into the container. These are JavaBeans properties of the bean, which do not have actual values set for them in the bean definition, or alternately provided automatically by the autowiring feature.
This feature is sometimes useful when you want to ensure that all properties (or all properties of a certain type) are set on a bean. Of course, in many cases a bean class will have default values for many properties, or some properties do not apply to all usage scenarios, so this feature is of limited use. Dependency checking can also be enabled and disabled per bean, just as with the autowiring functionality. The default is to not check dependencies. Dependency checking can be handled in several different modes. When using XML-based configuration metadata, this is specified via the 'dependency-check' attribute in a bean definition, which may have the following values.
Table 3.3. Dependency checking modes
| Mode | Explanation |
|---|---|
| none | No dependency checking. Properties of the bean which have no value specified for them are simply not set. |
| simple | Dependency checking is performed for primitive types and collections (everything except collaborators, i.e. other beans) |
| object | Dependency checking is performed for collaborators only |
| all | Dependency checking is done for collaborators, primitive types and collections |
If you are using Java 5 (Tiger) and thus have access to source level annotations, you may find the section entitled Section 25.3.1, “@Required” to be of interest.
For most application scenarios, the majority of the beans in the container will be singletons. When a singleton bean needs to collaborate with (use) another singleton bean, or a non-singleton bean needs to collaborate with another non-singleton bean, the typical and common approach of handling this dependency by defining one bean to be a property of the other, is quite adequate. There is however a problem when the bean lifecycles are different. Consider a singleton bean A which needs to use a non-singleton (prototype) bean B, perhaps on each method invocation on A. The container will only create the singleton bean A once, and thus only get the opportunity to set its properties once. There is no opportunity for the container to provide bean A with a new instance of bean B every time one is needed.
One solution to this issue is to forgo some inversion of control. Bean A can be made aware of the container by implementing the BeanFactoryAware interface, and use programmatic means to ask the container via a getBean("B") call for (a typically new) bean B instance every time it needs it. Find below an admittedly somewhat contrived example of this approach:
// a class that uses a stateful Command-style class to perform some processing
package fiona.apple;

// lots of Spring-API imports
import org.springframework.beans.BeansException;
import org.springframework.beans.factory.BeanFactory;
import org.springframework.beans.factory.BeanFactoryAware;

public class CommandManager implements BeanFactoryAware {

   private BeanFactory beanFactory;

   public Object process(Map commandState) {
      // grab a new instance of the appropriate Command
      Command command = createCommand();
      // set the state on the (hopefully brand new) Command instance
      command.setState(commandState);
      return command.execute();
   }

   // the Command returned here could be an implementation that executes asynchronously, or whatever
   protected Command createCommand() {
      return (Command) this.beanFactory.getBean("command"); // notice the Spring API dependency
   }

   public void setBeanFactory(BeanFactory beanFactory) throws BeansException {
      this.beanFactory = beanFactory;
   }
}
The above example is generally is not a desirable solution since the business code is then aware of and coupled to the Spring Framework. Method Injection, a somewhat advanced feature of the Spring IoC container, allows this use case to be handled in a clean fashion.
Lookup method injection refers to the ability of the container to override methods on container managed beans, to return the result of looking up another named bean in the container. The lookup will typically be of a prototype bean as in the scenario described above (although it can also be a singleton of course - but in that case injecting the instance straight into the object would suffice). The Spring Framework implements this method injection by dynamically generating a subclass overriding the method, using bytecode generation via the CGLIB library.
So if you look at the code from previous code snippet (the CommandManager class), the Spring container is going to dynamically override the implementation of the createCommand() method. Your CommandManager class is not going to have any Spring dependencies, as can be seen in this reworked example below:
package fiona.apple;

// no more Spring imports!

public abstract class CommandManager {

   public Object process(Object commandState) {
      // grab a new instance of the appropriate Command interface
      Command command = createCommand();
      // set the state on the (hopefully brand new) Command instance
      command.setState(commandState);
      return command.execute();
   }

    // okay... but where is the implementation of this method?
   protected abstract Command createCommand();
}
In the client class containing the method to be injected (the CommandManager in this case), the method that is to be 'injected' must have a signature of the following form:
<public|protected> [abstract] <return-type> theMethodName(no-arguments);If the method is abstract, the dynamically-generated subclass will implement the method. Otherwise, the dynamically-generated subclass will override the concrete method defined in the original class. Let's look at an example:
<!-- a stateful bean deployed as a prototype (non-singleton) -->
<bean id="command" class="fiona.apple.AsyncCommand" scope="prototype">
  <!-- inject dependencies here as required -->
</bean>

<!-- commandProcessor uses statefulCommandHelper -->
<bean id="commandManager" class="fiona.apple.CommandManager">
  <lookup-method name="createCommand" bean="command"/>
</bean>
The bean identified as commandManager will call its own method createCommand() whenever it needs a new instance of the command bean. It is important to note that the person deploying the beans must be careful to deploy the command bean as a prototype (if that is actually what is needed). If it is deployed as a singleton (either explicitly, or relying on the default true setting for this flag), the same instance of the command bean will be returned each time!
Note that lookup method injection can be combined with both Constructor and Setter Injection.
Please be aware that in order for this dynamic subclassing to work, you will need to have the CGLIB jar(s) on your classpath. Additionally, the class that the Spring container is going to subclass cannot be final, and the method that is being overridden cannot be final either. Also, testing a class that has an abstract method can be somewhat odd in that you will have to subclass the class yourself and supply a stub implementation of the abstract method. Finally, beans that have been the target of method injection cannot be serialized.
| Tip |
|---|---|
The interested reader may also find the ServiceLocatorFactoryBean (in the org.springframework.beans.factory.config package) to be of use; the approach is similar to that of the ObjectFactoryCreatingFactoryBean, but it allows you to specify your own lookup interface as opposed to having to use a Spring-specific lookup interface such as the ObjectFactory. Consult the (copious) Javadocs for the ServiceLocatorFactoryBean for a full treatment of this alternative approach (that does reduce the coupling to Spring). | |
A less commonly useful form of method injection than Lookup Method Injection is the ability to replace arbitrary methods in a managed bean with another method implementation. Users may safely skip the rest of this section (which describes this somewhat advanced feature), until this functionality is actually needed.
When using XML-based configuration metadata, the replaced-method element may be used to replace an existing method implementation with another, for a deployed bean. Consider the following class, with a method computeValue, which we want to override:
public class MyValueCalculator {

  public String computeValue(String input) {
    // some real code...
  }

  // some other methods...

}
A class implementing the org.springframework.beans.factory.support.MethodReplacer interface provides the new method definition.
/** meant to be used to override the existing computeValue(String)
    implementation in MyValueCalculator
  */
public class ReplacementComputeValue implements MethodReplacer {

    public Object reimplement(Object o, Method m, Object[] args) throws Throwable {
        // get the input value, work with it, and return a computed result
        String input = (String) args[0];
        ...
        return ...;
    }
}
The bean definition to deploy the original class and specify the method override would look like this:
<bean id="myValueCalculator class="x.y.z.MyValueCalculator">
  <!-- arbitrary method replacement -->
  <replaced-method name="computeValue" replacer="replacementComputeValue">
    <arg-type>String</arg-type>
  </replaced-method>
</bean>

<bean id="replacementComputeValue" class="a.b.c.ReplacementComputeValue"/>
One or more contained <arg-type/> elements within the <replaced-method/> element may be used to indicate the method signature of the method being overridden. Note that the signature for the arguments is actually only needed in the case that the method is actually overloaded and there are multiple variants within the class. For convenience, the type string for an argument may be a substring of the fully qualified type name. For example, all the following would match java.lang.String.
    java.lang.String
    String
    Str
Since the number of arguments is often enough to distinguish between each possible choice, this shortcut can save a lot of typing, by allowing you to type just the shortest string that will match an argument type.
When you create a bean definition (typically in an XML configuration file) what you are actually creating is (loosely speaking) a recipe or template for creating actual instances of the objects defined by that bean definition. The fact that a bean definition is a recipe is important, because it means that, just like a class, you can potentially have many object instances created from a single recipe.
You can control not only the various dependencies and configuration values that are to be plugged into an object that is created from a particular bean definition, but also the scope of the objects created from a particular bean definition. This approach is very powerful and gives you the flexibility to choose the scope of the objects you create through configuration instead of having to 'bake in' the scope of an object at the Java class level. Beans can be defined to be deployed in one of a number of scopes: out of the box, the Spring Framework supports exactly five scopes (of which three are available only if you are using a web-aware Spring ApplicationContext).
The scopes supported out of the box are listed below:
Table 3.4. Bean scopes
| Scope | Description |
|---|---|
Scopes a single bean definition to a single object instance per Spring IoC container. | |
Scopes a single bean definition to any number of object instances. | |
Scopes a single bean definition to the lifecycle of a single HTTP request; i.e. each and every HTTP request will have its own instance of a bean created off the back of a single bean definition. Only valid in the context of a web-aware Spring ApplicationContext. | |
Scopes a single bean definition to the lifecycle of a HTTP Session. Only valid in the context of a web-aware Spring ApplicationContext. | |
Scopes a single bean definition to the lifecycle of a global HTTP Session. Typically only valid when used in a portlet context. Only valid in the context of a web-aware Spring ApplicationContext. |
When a bean is a singleton, only one shared instance of the bean will be managed and all requests for beans with an id or ids matching that bean definition will result in that one specific bean instance being returned by the Spring container.
To put it another way, when you define a bean definition and it is scoped as a singleton, then the Spring IoC container will create exactly one instance of the object defined by that bean definition (or recipe). This single instance will be stored in a singleton cache, and all subsequent requests and references for that named bean will result in the cached object instance being returned.
The following diagram illustrates the Spring singleton scope.
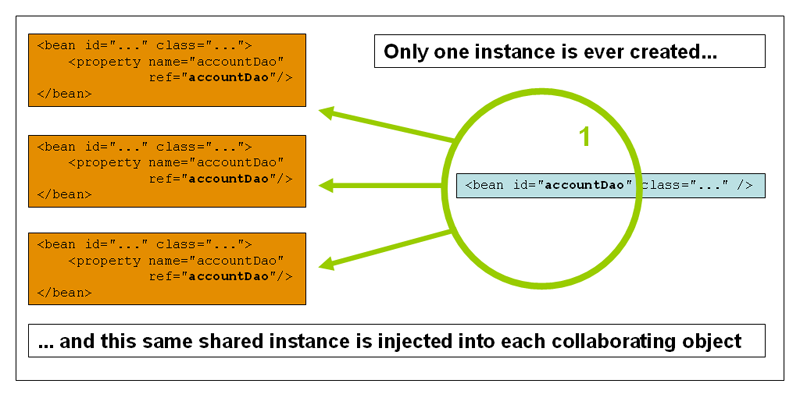
Please be aware that Spring's concept of a singleton bean is quite different from the Singleton pattern as defined in the seminal Gang of Four (GoF) patterns book. The classic GoF Singleton hardcodes the scope of an object such that one and only one instance of a particular class will ever be created per ClassLoader. The scope of the Spring singleton is best described as per container and per bean. This means that if you define one bean for a particular class in a single Spring container, then the Spring container will create one and only one instance of the class defined by that bean definition.
The singleton scope is the default scope in Spring. To define a bean as a singleton in XML, you would write configuration like so:
<bean id="accountService" class="com.foo.DefaultAccountService"/>

<!-- the following is equivalent, though redundant (singleton scope is the default); using spring-beans-2.0.dtd -->
<bean id="accountService" class="com.foo.DefaultAccountService" scope="singleton"/>

<!-- the following is equivalent and preserved for backward compatibility in spring-beans.dtd -->
<bean id="accountService" class="com.foo.DefaultAccountService" singleton="true"/>
The non-singleton, prototype scope of bean deployment results in the creation of a new bean instance every time a request for that specific bean is made (that is, it is injected into another bean or it is requested via a programmatic getBean() method call on the container). As a rule of thumb, you should use the prototype scope for all beans that are stateful, while the singleton scope should be used for stateless beans.
The following diagram illustrates the Spring prototype scope. Please note that a DAO would not typically be configured as a prototype, since a typical DAO would not hold any conversational state; it was just easier for this author to reuse the core of the singleton diagram.
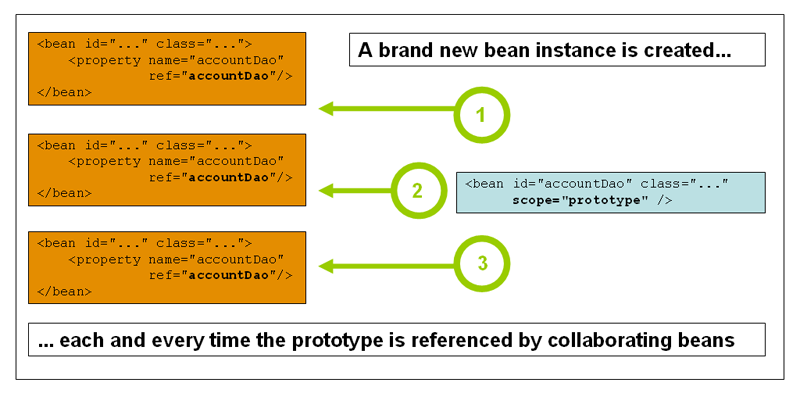
To define a bean as a prototype in XML, you would write configuration like so:
<!-- using spring-beans-2.0.dtd -->
<bean id="accountService" class="com.foo.DefaultAccountService" scope="prototype"/>

<!-- the following is equivalent and preserved for backward compatibility in spring-beans.dtd -->
<bean id="accountService" class="com.foo.DefaultAccountService" singleton="false"/>
There is one quite important thing to be aware of when deploying a bean in the prototype scope, in that the lifecycle of the bean changes slightly. Spring cannot (and hence does not) manage the complete lifecycle of a prototype bean: the container instantiates, configures, decorates and otherwise assembles a prototype object, hands it to the client and then has no further knowledge of that prototype instance. This means that while initialization lifecycle callback methods will be (and are) called on all objects regardless of scope, in the case of prototypes, any configured destruction lifecycle callbacks will not be called. It is the responsibility of the client code to clean up prototype scoped objects and release any expensive resources that the prototype bean(s) are holding onto. (One possible way to get the Spring container to release resources used by singleton-scoped beans is through the use of a bean post processor which would hold a reference to the beans that need to be cleaned up.)
In some respects, you can think of the Spring container's role when talking about a prototype-scoped bean as somewhat of a replacement for the Java 'new' operator. Any lifecycle aspects past that point have to be handled by the client. The lifecycle of a bean in a Spring IoC container is further described in the section entitled Section 3.5.1, “Lifecycle interfaces”.
| Backwards compatibility note: specifying the lifecycle scope in XML |
|---|---|
If you are referencing the 'spring-beans.dtd' DTD in a bean definition file(s), and you are being explicit about the lifecycle scope of your bean(s) you must use the "singleton" attribute to express the lifecycle scope (remembering that the singleton lifecycle scope is the default). If you are referencing the 'spring-beans-2.0.dtd' DTD or the Spring 2.0 XSD schema, then you will need to use the "scope" attribute (because the "singleton" attribute was removed from the definition of the new DTD and XSD files in favour of the "scope" attribute). To be totally clear about this, this means that if you use the "singleton" attribute in an XML bean definition then you must be referencing the 'spring-beans.dtd' DTD in that file. If you are using the "scope" attribute then you must be referencing either the 'spring-beans-2.0.dtd' DTD or the 'spring-beans-2.0.xsd' XSD in that file. | |
The other scopes, namely request, session, and global session are for use only in web-based applications (and can be used irrespective of which particular web application framework you are using, if indeed any). In the interest of keeping related concepts together in one place in the reference documentation, these scopes are described here.
| Note |
|---|---|
The scopes that are described in the following paragraphs are only available if you are using a web-aware Spring ApplicationContext implementation (such as XmlWebApplicationContext). If you try using these next scopes with regular Spring IoC containers such as the XmlBeanFactory or ClassPathXmlApplicationContext, you will get an IllegalStateException complaining about an unknown bean scope. | |
In order to effect the scoping of beans at the request, session, and global session levels (i.e. web-scoped beans), some minor initial configuration is required before you can set about defining your bean definitions. Please note that this extra setup is not required if you just want to use the 'standard' scopes; i.e. singleton and prototype.
Now as things stand, there are a couple of ways to effect this initial setup depending on your particular servlet environment. If you are using a Servlet 2.4+ web container, then you need only add the following ContextListener to the XML declarations in your web application's 'web.xml' file.
<web-app>
  ...
  <listener>
    <listener-class>org.springframework.web.context.request.RequestContextListener</listener-class>
  </listener>
  ...
</web-app>
If you are using an older web container (before Servlet 2.4), you will need to use a (provided) javax.servlet.Filter implementation. Find below a snippet of XML configuration that has to be included in the 'web.xml' file of your web application if you want to have access to web-scoped beans (the filter settings depend on the surrounding web application configuration and so you will have to change them as appropriate).
<web-app>
  ..
  <filter>
    <filter-name>requestContextFilter</filter-name>
    <filter-class>org.springframework.web.filter.RequestContextFilter</filter-class>
  </filter>
  <filter-mapping>
    <filter-name>requestContextFilter</filter-name>
    <url-pattern>/*</url-pattern>
  </filter-mapping>
  ...
</web-app>
That's it. The RequestContextListener and RequestContextFilter classes both do exactly the same thing, namely bind the HTTP request object to the Thread that is servicing that request. This makes beans that are request- and session-scoped available further down the call chain.
Consider the following bean definition:
<bean id="loginAction" class="com.foo.LoginAction" scope="request"/>
With the above bean definition in place, the Spring container will create a brand new instance of the LoginAction bean using the 'loginAction' bean definition for each and every HTTP request. That is, the 'loginAction' bean will be effectively scoped at the HTTP request level. You can change or dirty the internal state of the instance that is created as much as you want, safe in the knowledge that other requests that are also using instances created off the back of the same 'loginAction' bean definition will not be seeing these changes in state since they are particular to an individual request. When the request is finished processing, the bean that is scoped to the request will be discarded.
Consider the following bean definition:
<bean id="userPreferences" class="com.foo.UserPreferences" scope="session"/>
With the above bean definition in place, the Spring container will create a brand new instance of the UserPreferences bean using the 'userPreferences' bean definition for the lifetime of a single HTTP Session. In other words, the 'userPreferences' bean will be effectively scoped at the HTTP Session level. Just like request-scoped beans, you can change the internal state of the instance that is created as much as you want, safe in the knowledge that other HTTP Session instances that are also using instances created off the back of the same 'userPreferences' bean definition will not be seeing these changes in state since they are particular to an individual HTTP Session. When the HTTP Session is eventually discarded, the bean that is scoped to that particular HTTP Session will also be discarded.
Consider the following bean definition:
<bean id="userPreferences" class="com.foo.UserPreferences" scope="globalSession"/>
The global session scope is similar to the standard HTTP Session scope (described immediately above), and really only makes sense in the context of portlet-based web applications. The portlet specification defines the notion of a global Session that is shared amongst all of the various portlets that make up a single portlet web application. Beans defined at the global session scope are scoped (or bound) to the lifetime of the global portlet Session.
Please note that if you are writing a standard Servlet-based web application and you define one or more beans as having global session scope, the standard HTTP Session scope will be used, and no error will be raised.
Being able to define a bean scoped to a HTTP request or Session (or indeed a custom scope of your own devising) is all very well, but one of the main value-adds of the Spring IoC container is that it manages not only the instantiation of your objects (beans), but also the wiring up of collaborators (or dependencies). If you want to inject a (for example) HTTP request scoped bean into another bean, you will need to inject an AOP proxy in place of the scoped bean. That is, you need to inject a proxy object that exposes the same public interface as the scoped object, but that is smart enough to be able to retrieve the real, target object from the relevant scope (for example a HTTP request) and delegate method calls onto the real object.
| Note |
|---|---|
You do not need to use the <aop:scoped-proxy/> in conjunction with beans that are scoped as singletons or prototypes. It is an error to try to create a scoped proxy for a singleton bean (and the resulting BeanCreationException will certainly set you straight in this regard). | |
Let's look at the configuration that is required to effect this; the configuration is not hugely complex (it takes just one line), but it is important to understand the “why” as well as the “how” behind it.
<?xml version="1.0" encoding="UTF-8"?>
<beans xmlns="http://www.springframework.org/schema/beans"
       xmlns:xsi="http://www.w3.org/2001/XMLSchema-instance"
       xmlns:aop="http://www.springframework.org/schema/aop"
       xsi:schemaLocation="
http://www.springframework.org/schema/beans http://www.springframework.org/schema/beans/spring-beans-2.0.xsd
http://www.springframework.org/schema/aop http://www.springframework.org/schema/aop/spring-aop-2.0.xsd">

    <!-- a HTTP Session-scoped bean exposed as a proxy -->
    <bean id="userPreferences" class="com.foo.UserPreferences" scope="session">

          <!-- this next element effects the proxying of the surrounding bean -->
          <aop:scoped-proxy/>
    </bean>

    <!-- a singleton-scoped bean injected with a proxy to the above bean -->
    <bean id="userService" class="com.foo.SimpleUserService">

        <!-- a reference to the proxied 'userPreferences' bean -->
        <property name="userPreferences" ref="userPreferences"/>

    </bean>
</beans>
To create such a proxy, you need only to insert a child <aop:scoped-proxy/> element into a scoped bean definition (you may also need the CGLIB library on your classpath so that the container can effect class-based proxying; you will also need to be using Appendix A, XML Schema-based configuration). So, just why do you need this <aop:scoped-proxy/> element in the definition of beans scoped at the request, session, globalSession and 'insert your custom scope here' level? The reason is best explained by picking apart the following bean definition (please note that the following 'userPreferences' bean definition as it stands is incomplete):
<bean id="userPreferences" class="com.foo.UserPreferences" scope="session"/>

<bean id="userManager" class="com.foo.UserManager">
    <property name="userPreferences" ref="userPreferences"/>
</bean>
From the above configuration it is evident that the singleton bean 'userManager' is being injected with a reference to the HTTP Session-scoped bean 'userPreferences'. The salient point here is that the 'userManager' bean is a singleton... it will be instantiated exactly once per container, and its dependencies (in this case only one, the 'userPreferences' bean) will also only be injected (once!). This means that the 'userManager' will (conceptually) only ever operate on the exact same 'userPreferences' object, that is the one that it was originally injected with. This is not what you want when you inject a HTTP Session-scoped bean as a dependency into a collaborating object (typically). Rather, what we do want is a single 'userManager' object, and then, for the lifetime of a HTTP Session, we want to see and use a 'userPreferences' object that is specific to said HTTP Session.
Rather what you need then is to inject some sort of object that exposes the exact same public interface as the UserPreferences class (ideally an object that is a UserPreferences instance) and that is smart enough to be able to go off and fetch the real UserPreferences object from whatever underlying scoping mechanism we have chosen (HTTP request, Session, etc.). We can then safely inject this proxy object into the 'userManager' bean, which will be blissfully unaware that the UserPreferences reference that it is holding onto is a proxy. In the case of this example, when a UserManager instance invokes a method on the dependency-injected UserPreferences object, it is really invoking a method on the proxy... the proxy will then go off and fetch the real UserPreferences object from (in this case) the HTTP Session, and delegate the method invocation onto the retrieved real UserPreferences object.
That is why you need the following, correct and complete, configuration when injecting request-, session-, and globalSession-scoped beans into collaborating objects:
<bean id="userPreferences" class="com.foo.UserPreferences" scope="session">
    <aop:scoped-proxy/>
</bean>

<bean id="userManager" class="com.foo.UserManager">
    <property name="userPreferences" ref="userPreferences"/>
</bean>By default, when the Spring container is creating a proxy for a bean that is marked up with the <aop:scoped-proxy/> element, a CGLib-based class proxy will be created. This means that you will need to have the CGLib library on the classapth for your application.
You can choose to have the Spring container create 'standard' JDK interface-based proxies for such scoped beans by specifying 'false' for the value of the 'proxy-target-class' attribute of the <aop:scoped-proxy/> element. Using JDK interface-based proxies does mean that you don't need any additional libraries on your application's classpath to effect such proxying, but it does mean that the class of the scoped bean must implement at least one interface, and all of the collaborators into which the scoped bean is injected must be referencing the bean via one of its interfaces.
<!-- DefaultUserPreferences implements the UserPreferences interface -->
<bean id="userPreferences" class="com.foo.DefaultUserPreferences" scope="session">
    <aop:scoped-proxy proxy-target-class="false" proxy-target-class="false"/>
</bean>

<bean id="userManager" class="com.foo.UserManager">
    <property name="userPreferences" ref="userPreferences"/>
</bean>
The section entitled Section 6.6, “Proxying mechanisms” may also be of some interest with regard to understanding the nuances of choosing whether class-based or interface-based proxying is right for you.
As of Spring 2.0, the bean scoping mechanism in Spring is extensible. This means that you are not limited to just the bean scopes that Spring provides out of the box; you can define your own scopes, or even redefine the existing scopes (although that last one would probably be considered bad practice - please note that you cannot override the built-in singleton and prototype scopes).
Scopes are defined by the org.springframework.beans.factory.config.Scope interface. This is the interface that you will need to implement in order to integrate your own custom scope(s) into the Spring container, and is described in detail below. You may wish to look at the Scope implementations that are supplied with the Spring Framework itself for an idea of how to go about implementing your own. The Scope JavaDoc explains the main class to implement when you need your own scope in more detail too.
The Scope interface has four methods dealing with getting objects from the scope, removing them from the scope and allowing them to be 'destroyed' if needed.
The first method should return the object from the underlying scope. The session scope implementation for example will return the session-scoped bean (and if it does not exist, return a new instance of the bean, after having bound it to the session for future reference).
Object get(String name, ObjectFactory objectFactory)
The second method should remove the object from the underlying scope. The session scope implementation for example, removes the session-scoped bean from the underlying session. The object should be returned (you are allowed to return null if the object with the specified name wasn't found)
Object remove(String name)
The third method is used to register callbacks the scope should execute when it is destroyed or when the specified object in the scope is destroyed. Please refer to the JavaDoc or a Spring scope implementation for more information on destruction callbacks.
void registerDestructionCallback(String name, Runnable destructionCallback)
The last method deals with obtaining the conversation identifier for the underlying scope. This identifier is different for each scope. For a session for example, this can be the session identifier.
String getConversationId()
After you have written and tested one or more custom Scope implementations, you then need to make the Spring container aware of your new scope(s). The central method to register a new Scope with the Spring container is declared on the ConfigurableBeanFactory interface (implemented by most of the concrete BeanFactory implementations that ship with Spring); this central method is displayed below:
void registerScope(String scopeName, Scope scope);
The first argument to the registerScope(..) method is the unique name associated with a scope; examples of such names in the Spring container itself are 'singleton' and 'prototype'. The second argument to the registerScope(..) method is an actual instance of the custom Scope implementation that you wish to register and use.
Let's assume that you have written your own custom Scope implementation, and you have registered it like so:
// note: the ThreadScope class does not ship with the Spring Framework
Scope customScope = new ThreadScope();
beanFactory.registerScope("thread", scope);
You can then create bean definitions that adhere to the scoping rules of your custom Scope like so:
<bean id="..." class="..." scope="thread"/>If you have your own custom Scope implementation(s), you are not just limited to only programmatic registration of the custom scope(s). You can also do the Scope registration declaratively, using the CustomScopeConfigurer class.
The declarative registration of custom Scope implementations using the CustomScopeConfigurer class is shown below:
<?xml version="1.0" encoding="UTF-8"?>
<beans xmlns="http://www.springframework.org/schema/beans" xmlns:xsi="http://www.w3.org/2001/XMLSchema-instance"
       xmlns:aop="http://www.springframework.org/schema/aop"
       xsi:schemaLocation="
http://www.springframework.org/schema/beans http://www.springframework.org/schema/beans/spring-beans-2.0.xsd
http://www.springframework.org/schema/aop http://www.springframework.org/schema/aop/spring-aop-2.0.xsd">

    <bean class="org.springframework.beans.factory.config.CustomScopeConfigurer">
        <property name="scopes">
            <map>
                <entry key="thread">
                    <bean class="com.foo.ThreadScope"/>
                </entry>
            </map>
        </property>
    </bean>

    <bean id="bar" class="x.y.Bar" scope="thread">
        <property name="name" value="Rick"/>
        <aop:scoped-proxy/>
    </bean>

    <bean id="foo" class="x.y.Foo">
        <property name="bar" ref="bar"/>
    </bean>

</beans>The Spring Framework provides several marker interfaces to change the behavior of your bean in the container; they include InitializingBean and DisposableBean. Implementing these interfaces will result in the container calling afterPropertiesSet() for the former and destroy() for the latter to allow the bean to perform certain actions upon initialization and destruction.
Internally, the Spring Framework uses BeanPostProcessor implementations to process any marker interfaces it can find and call the appropriate methods. If you need custom features or other lifecycle behavior Spring doesn't offer out-of-the-box, you can implement a BeanPostProcessor yourself. More information about this can be found in the section entitled Section 3.7, “Container extension points”.
All the different lifecycle marker interfaces are described below. In one of the appendices, you can find diagram that show how Spring manages beans and how those lifecycle features change the nature of your beans and how they are managed.
Implementing the org.springframework.beans.factory.InitializingBean interface allows a bean to perform initialization work after all necessary properties on the bean are set by the container. The InitializingBean interface specifies exactly one method:
void afterPropertiesSet() throws Exception;
Generally, the use of the InitializingBean interface can be avoided (and is discouraged since it unnecessarily couples the code to Spring). A bean definition provides support for a generic initialization method to be specified. In the case of XML-based configuration metadata, this is done using the 'init-method' attribute. For example, the following definition:
<bean id="exampleInitBean" class="examples.ExampleBean" init-method="init"/>
public class ExampleBean {

    public void init() {
        // do some initialization work
    }
}
Is exactly the same as...
<bean id="exampleInitBean" class="examples.AnotherExampleBean"/>
public class AnotherExampleBean implements InitializingBean {

    public void afterPropertiesSet() {
        // do some initialization work
    }
}
... but does not couple the code to Spring.
Implementing the org.springframework.beans.factory.DisposableBean interface allows a bean to get a callback when the container containing it is destroyed. The DisposableBean interface specifies one method:
void destroy() throws Exception;
Generally, the use of the DisposableBean marker interface can be avoided (and is discouraged since it unnecessarily couples the code to Spring). A bean definition provides support for a generic destroy method to be specified. When using XML-based configuration metadata this is done via the 'destroy-method' attribute on the <bean/>. For example, the following definition:
<bean id="exampleInitBean" class="examples.ExampleBean" destroy-method="cleanup"/>
public class ExampleBean {

    public void cleanup() {
        // do some destruction work (like releasing pooled connections)
    }
}
Is exactly the same as...
<bean id="exampleInitBean" class="examples.AnotherExampleBean"/>
public class AnotherExampleBean implements DisposableBean {

    public void destroy() {
        // do some destruction work (like releasing pooled connections)
    }
}
... but does not couple the code to Spring.
When you are writing initialization and destroy method callbacks that do not use the Spring-specific InitializingBean and DisposableBean callback interfaces, one (in the experience of this author) typically finds oneself writing methods with names such as init(), initialize(), dispose(), etc. The names of such lifecycle callback methods are (hopefully!) standardized across a project so that developers on a team all use the same method names and thus ensure some level of consistency.
The Spring container can now be configured to 'look' for named initialization and destroy callback method names on every bean. This means that you as an application developer can simply write your application classes, use a convention of having an initialization callback called init(), and then (without having to configure each and every bean with, in the case of XML-based configuration, an 'init-method="init"' attribute) be safe in the knowledge that the Spring IoC container will call that method when the bean is being created (and in accordance with the standard lifecycle callback contract described previously).
Let's look at an example to make the use of this feature completely clear. For the sake of the example, let us say that one of the coding conventions on a project is that all initialization callback methods are to be named init() and that destroy callback methods are to be called destroy(). This leads to classes like so...
public class DefaultBlogService implements BlogService {

    private BlogDao blogDao;

    public void setBlogDao(BlogDao blogDao) {
        this.blogDao = blogDao;
    }

    // this is (unsurprisingly) the initialization callback method
    public void init() {
        if (this.blogDao == null) {
            throw new IllegalStateException("The [blogDao] property must be set.");
        }
    }
}
<beans default-init-method="init">
<bean id="blogService" class="com.foo.DefaultBlogService">
<property name="blogDao" ref="blogDao" />
</bean>
</beans>Notice the use of the 'default-init-method' attribute on the top-level <beans/> element. The presence of this attribute means that the Spring IoC container will recognize a method called 'init' on beans as being the initialization method callback, and when a bean is being created and assembled, if the bean's class has such a method, it will be invoked at the appropriate time.
Destroy method callbacks are configured similarly (in XML that is) using the 'default-destroy-method' attribute on the top-level <beans/> element.
The use of this feature can save you the (small) housekeeping chore of specifying an initialization and destroy method callback on each and every bean, and it is great for enforcing a consistent naming convention for initialization and destroy method callbacks (and consistency is something that should always be aimed for).
Consider the case where you have some existing beans where the underlying classes already have initialization callback methods that are named at variance with the convention. You can always override the default by specifying (in XML that is) the method name using the 'init-method' and 'destroy-method' attributes on the <bean/> element itself.
Finally, please be aware that the Spring container guarantees that a configured initialization callback is called immediately after a bean has been supplied with all of it's dependencies. This means that the initialization callback will be called on the raw bean reference, which means that any AOP interceptors or suchlike that will ultimately be applied to the bean will not yet be in place. A target bean is fully created first, then an AOP proxy (for example) with its interceptor chain is applied. Note that, if the target bean and the proxy are defined separately, your code can even interact to the raw target bean, bypassing the proxy. Hence, it would be very inconsistent to apply the interceptors to the init method, since that would couple the lifecycle of the target bean with its proxy/interceptors, and leave strange semantics when talking to the raw target bean directly.
| Note |
|---|---|
This next section does not apply to web applications (in case the title of this section did not make that abundantly clear). Spring's web-based ApplicationContext implementations already have code in place to handle shutting down the Spring IoC container gracefully when the relevant web application is being shutdown. | |
If you are using Spring's IoC container in a non-web application environment, for example in a rich client desktop environment, and you want the container to shutdown gracefully and call the relevant destroy callbacks on your singleton beans, you will need to register a shutdown hook with the JVM. This is quite easy to do (see below), and will ensure that your Spring IoC container shuts down gracefully and that all resources held by your singletons are released (of course it is still up to you to both configure the destroy callbacks for your singletons and implement such destroy callbacks correctly).
So to register a shutdown hook that enables the graceful shutdown of the relevant Spring IoC container, you simply need to call the registerShutdownHook() method that is declared on the AbstractApplicationContext class. To wit...
import org.springframework.context.support.AbstractApplicationContext;
import org.springframework.context.support.ClassPathXmlApplicationContext;

public final class Boot {

    public static void main(final String[] args) throws Exception {
        AbstractApplicationContext ctx
            = new ClassPathXmlApplicationContext(new String []{"beans.xml"});

        // add a shutdown hook for the above context...
        ctx.registerShutdownHook();

        // app runs here...

        // main method exits, hook is called prior to the app shutting down...
    }
}A class which implements the org.springframework.beans.factory.BeanFactoryAware interface is provided with a reference to the BeanFactory that created it, when it is created by that BeanFactory.
public interface BeanFactoryAware {

    void setBeanFactory(BeanFactory beanFactory) throws BeansException;
}
This allows beans to manipulate the BeanFactory that created them programmatically, through the BeanFactory interface, or by casting the reference to a known subclass of this which exposes additional functionality. Primarily this would consist of programmatic retrieval of other beans. While there are cases when this capability is useful, it should generally be avoided, since it couples the code to Spring, and does not follow the Inversion of Control style, where collaborators are provided to beans as properties.
An alternative option that is equivalent in effect to the BeanFactoryAware-based approach is to use the org.springframework.beans.factory.config.ObjectFactoryCreatingFactoryBean. (It should be noted that this approach still does not reduce the coupling to Spring, but it does not violate the central principle of IoC as much as the BeanFactoryAware-based approach.)
The ObjectFactoryCreatingFactoryBean is a FactoryBean implementation that returns a reference to an object (factory) that can in turn be used to effect a bean lookup. The ObjectFactoryCreatingFactoryBean class does itself implement the BeanFactoryAware interface; what client beans are actually injected with is an instance of the ObjectFactory interface. This is a Spring-specific interface (and hence there is still no total decoupling from Spring), but clients can then use the ObjectFactory's getObject() method to effect the bean lookup (under the hood the ObjectFactory implementation instance that is returned simply delegates down to a BeanFactory to actually lookup a bean by name). All that you need to do is supply the ObjectFactoryCreatingFactoryBean with the name of the bean that is to be looked up. Let's look at an example:
package x.y;

public class NewsFeed {

    private String news;

    public void setNews(String news) {
        this.news = news;
    }

    public String getNews() {
        return this.toString() + ": '" + news + "'";
    }
}
package x.y;
import org.springframework.beans.factory.ObjectFactory;
public class NewsFeedManager {
private ObjectFactory factory;
public void setFactory(ObjectFactory factory) {
this.factory = factory;
}
public void printNews() {
// here is where the lookup is performed; note that there is no
// need to hardcode the name of the bean that is being looked up...
NewsFeed news = (NewsFeed) factory.getObject();
System.out.println(news.getNews());
}
}Find below the XML configuration to wire together the above classes using the ObjectFactoryCreatingFactoryBean approach.
<beans>
    <bean id="newsFeedManager" class="x.y.NewsFeedManager">
        <property name="factory">
            <bean
class="org.springframework.beans.factory.config.ObjectFactoryCreatingFactoryBean">
                <property name="targetBeanName">
                    <idref local="newsFeed" />
                </property>
            </bean>
        </property>
    </bean>
    <bean id="newsFeed" class="x.y.NewsFeed" scope="prototype">
        <property name="news" value="... that's fit to print!" />
    </bean>
</beans>
And here is a small driver program to test the fact that new (prototype) instances of the newsFeed bean are actually being returned for each call to the injected ObjectFactory inside the NewsFeedManager's printNews() method.
import org.springframework.context.ApplicationContext;
import org.springframework.context.support.ClassPathXmlApplicationContext;
import x.y.NewsFeedManager;

public class Main {

    public static void main(String[] args) throws Exception {

        ApplicationContext ctx = new ClassPathXmlApplicationContext("beans.xml");
        NewsFeedManager manager = (NewsFeedManager) ctx.getBean("newsFeedManager");
        manager.printNews();
        manager.printNews();
    }
}
The output from running the above program will look like so (results will of course vary on your machine).
x.y.NewsFeed@1292d26: '... that's fit to print!'
x.y.NewsFeed@5329c5: '... that's fit to print!'
If a bean implements the org.springframework.beans.factory.BeanNameAware interface and is deployed in a BeanFactory, the BeanFactory will call the bean through this interface to inform the bean of the id it was deployed under. The callback will be invoked after population of normal bean properties but before an initialization callback like InitializingBean's afterPropertiesSet or a custom init-method.
A bean definition potentially contains a large amount of configuration information, including container specific information (i.e. initialization method, static factory method name, etc.) and constructor arguments and property values. A child bean definition is a bean definition which inherits configuration data from a parent definition. It is then able to override some values, or add others, as needed. Using parent and child bean definitions can potentially save a lot of typing. Effectively, this is a form of templating.
When working with a BeanFactory programmatically, child bean definitions are represented by the ChildBeanDefinition class. Most users will never work with them on this level, instead configuring bean definitions declaratively in something like the XmlBeanFactory. When using XML-based configuration metadata a child bean definition is indicated simply by using the 'parent' attribute, specifying the parent bean as the value of this attribute.
<bean id="inheritedTestBean" abstract="true"
    class="org.springframework.beans.TestBean">
  <property name="name" value="parent"/>
  <property name="age" value="1"/>
</bean>

<bean id="inheritsWithDifferentClass"
      class="org.springframework.beans.DerivedTestBean"
      parent="inheritedTestBean" init-method="initialize">

  <property name="name" value="override"/>
  <!-- the age property value of 1 will be inherited from  parent -->

</bean>
A child bean definition will use the bean class from the parent definition if none is specified, but can also override it. In the latter case, the child bean class must be compatible with the parent, i.e. it must accept the parent's property values.
A child bean definition will inherit constructor argument values, property values and method overrides from the parent, with the option to add new values. If any init-method, destroy-method and/or static factory method settings are specified, they will override the corresponding parent settings.
The remaining settings will always be taken from the child definition: depends on, autowire mode, dependency check, singleton, scope, lazy init.
Note that in the example above, we have explicitly marked the parent bean definition as abstract by using the abstract attribute. In the case that the parent definition does not specify a class, and so explicitly marking the parent bean definition as abstract is required:
<bean id="inheritedTestBeanWithoutClass" abstract="true">
    <property name="name" value="parent"/>
    <property name="age" value="1"/>
</bean>

<bean id="inheritsWithClass" class="org.springframework.beans.DerivedTestBean"
    parent="inheritedTestBeanWithoutClass" init-method="initialize">
  <property name="name" value="override"/>
  <!-- age will inherit the value of 1 from the parent bean definition-->
</bean>
The parent bean cannot get instantiated on its own since it is incomplete, and it is also explicitly marked as abstract. When a definition is defined to be abstract like this, it is usable only as a pure template bean definition that will serve as a parent definition for child definitions. Trying to use such an abstract parent bean on its own (by referring to it as a ref property of another bean, or doing an explicit getBean() call with the parent bean id), will result in an error. Similarly, the container's internal preInstantiateSingletons() method will completely ignore bean definitions which are defined as abstract.
| Note |
|---|---|
ApplicationContexts (but not BeanFactories) will by default pre-instantiate all singletons. Therefore it is important (at least for singleton beans) that if you have a (parent) bean definition which you intend to use only as a template, and this definition specifies a class, you must make sure to set the 'abstract' attribute to 'true', otherwise the application context will actually (attempt to) pre-instantiate the abstract bean. | |
The IoC component of the Spring Framework has been designed for extension. There is typically no need for an application developer to subclass any of the various BeanFactory or ApplicationContext implementation classes. The Spring IoC container can be infinitely extended by plugging in implementations of special integration interfaces. The next few sections are devoted to detailing all of these various integration interfaces.
The first extension point that we will look at is the BeanPostProcessor interface. This interface defines a number of callback methods that you as an application developer can implement in order to provide your own (or override the containers default) instantiation logic, dependency-resolution logic, and so forth. If you want to do some custom logic after the Spring container has finished instantiating, configuring and otherwise initializing a bean, you can plug in one or more BeanPostProcessor implementations.
You can configure multiple BeanPostProcessors if you wish. You can control the order in which these BeanPostProcessors execute by setting the 'order' property (you can only set this property if the BeanPostProcessor implements the Ordered interface; if you write your own BeanPostProcessor you should consider implementing the Ordered interface too); consult the Javadocs for the BeanPostProcessor and Ordered interfaces for more details.
| Note |
|---|---|
BeanPostProcessors operate on bean (or object) instances; that is to say, the Spring IoC container will have instantiated a bean instance for you, and then BeanPostProcessors get a chance to do their stuff. If you want to change the actual bean definition (i.e. the recipe that defines the bean), then you rather need to use a BeanFactoryPostProcessor (described below in the section entitled Section 3.7.2, “Customizing configuration metadata with BeanFactoryPostProcessors”. Also, BeanPostProcessors are scoped per-container. This is only relevant if you are using container hierarchies. If you define a BeanPostProcessor in one container, it will only do its stuff on the beans in that container. Beans that are defined in another container will not be post-processed by BeanPostProcessors in another container, even if both containers are part of the same hierarchy. | |
The org.springframework.beans.factory.config.BeanPostProcessor interface consists of exactly two callback methods. When such a class is registered as a post-processor with the container (see below for how this registration is effected), for each bean instance that is created by the container, the post-processor will get a callback from the container both before any container initialization methods (such as afterPropertiesSet and any declared init method) are called, and also afterwards. The post-processor is free to do what it wishes with the bean instance, including ignoring the callback completely. A bean post-processor will typically check for marker interfaces, or do something such as wrap a bean with a proxy; some of the Spring AOP infrastructure classes are implemented as bean post-processors and they do this proxy-wrapping logic.
It is important to know that a BeanFactory treats bean post-processors slightly differently than an ApplicationContext. An ApplicationContext will automatically detect any beans which are defined in the configuration metadata which is supplied to it that implement the BeanPostProcessor interface, and register them as post-processors, to be then called appropriately by the container on bean creation. Nothing else needs to be done other than deploying the post-processors in a similar fashion to any other bean. On the other hand, when using a BeanFactory implementation, bean post-processors explicitly have to be registered, with code like this:
ConfigurableBeanFactory factory = new XmlBeanFactory(...);

    // now register any needed BeanPostProcessor instances
    MyBeanPostProcessor postProcessor = new MyBeanPostProcessor();
    factory.addBeanPostProcessor(postProcessor);

    // now start using the factory
This explicit registration step is not convenient, and this is one of the reasons why the various ApplicationContext implementations are preferred above plain BeanFactory implementations in the vast majority of Spring-backed applications, especially when using BeanPostProcessors.
Find below some examples of how to write, register, and use BeanPostProcessors in the context of an ApplicationContext.
This first example is hardly compelling, but serves to illustrate basic usage. All we are going to do is code a custom BeanPostProcessor implementation that simply invokes the toString() method of each bean as it is created by the container and prints the resulting string to the system console. Yes, it is not hugely useful, but serves to get the basic concepts across before we move into the second example which is actually useful.
Find below the custom BeanPostProcessor implementation class definition:
package scripting;

import org.springframework.beans.factory.config.BeanPostProcessor;
import org.springframework.beans.BeansException;

public class InstantiationTracingBeanPostProcessor implements BeanPostProcessor {

    // simply return the instantiated bean as-is
    public Object postProcessBeforeInitialization(Object bean, String beanName) throws BeansException {
        return bean; // we could potentially return any object reference here...
    }

    public Object postProcessAfterInitialization(Object bean, String beanName) throws BeansException {
        System.out.println("Bean '" + beanName + "' created : " + bean.toString());
        return bean;
    }
}
<?xml version="1.0" encoding="UTF-8"?>
<beans xmlns="http://www.springframework.org/schema/beans"
xmlns:xsi="http://www.w3.org/2001/XMLSchema-instance"
xmlns:lang="http://www.springframework.org/schema/lang"
xsi:schemaLocation="
http://www.springframework.org/schema/beans http://www.springframework.org/schema/beans/spring-beans-2.0.xsd
http://www.springframework.org/schema/lang http://www.springframework.org/schema/lang/spring-lang-2.0.xsd">
<lang:groovy id="messenger"
script-source="classpath:org/springframework/scripting/groovy/Messenger.groovy">
<lang:property name="message" value="Fiona Apple Is Just So Dreamy."/>
</lang:groovy>
<!--
when the above bean ('messenger') is instantiated, this custom
BeanPostProcessor implementation will output the fact to the system console
-->
<bean class="scripting.InstantiationTracingBeanPostProcessor"/>
</beans>Notice how the InstantiationTracingBeanPostProcessor is simply defined; it doesn't even have a name, and because it is a bean it can be dependency injected just like any other bean. (The above configuration also just so happens to define a bean that is backed by a Groovy script. The Spring 2.0 dynamic language support is detailed in the chapter entitled Chapter 24, Dynamic language support.)
Find below a small driver script to exercise the above code and configuration;
import org.springframework.context.ApplicationContext;
import org.springframework.context.support.ClassPathXmlApplicationContext;
import org.springframework.scripting.Messenger;

public final class Boot {

    public static void main(final String[] args) throws Exception {
        ApplicationContext ctx = new ClassPathXmlApplicationContext("scripting/beans.xml");
        Messenger messenger = (Messenger) ctx.getBean("messenger");
        System.out.println(messenger);
    }
}
The output of executing the above program will be (something like) this:
Bean 'messenger' created : org.springframework.scripting.groovy.GroovyMessenger@272961
org.springframework.scripting.groovy.GroovyMessenger@272961
Using marker interfaces or annotations in conjunction with a custom BeanPostProcessor implementation is a common means of extending the Spring IoC container. This next example is a bit of a cop-out, in that you are directed to the section entitled Section 25.3.1, “@Required” which demonstrates the usage of a custom BeanPostProcessor implementation that ships with the Spring distribution which ensures that JavaBean properties on beans that are marked with an (arbitrary) annotation are actually (configured to be) dependency-injected with a value.
The next extension point that we will look at is the org.springframework.beans.factory.config.BeanFactoryPostProcessor. The semantics of this interface are similar to the BeanPostProcessor, with one major difference. BeanFactoryPostProcessors operate on bean definitions (i.e. the configuration metadata that is supplied to a container); that is to say, the Spring IoC container will allow BeanFactoryPostProcessors to read the configuration metadata and potentially change it before the container has actually instantied any other beans.
You can configure multiple BeanFactoryPostProcessors if you wish. You can control the order in which these BeanFactoryPostProcessors execute by setting the 'order' property (you can only set this property if the BeanFactoryPostProcessor implements the Ordered interface; if you write your own BeanFactoryPostProcessor you should consider implementing the Ordered interface too); consult the Javadocs for the BeanFactoryPostProcessor and Ordered interfaces for more details.
| Note |
|---|---|
If you want to change the actual bean instances (i.e. the objects that are created from the configuration metadata), then you rather need to use a BeanPostProcessor (described above in the section entitled Section 3.7.1, “Customizing beans using BeanPostProcessors”. Also, BeanFactoryPostProcessors are scoped per-container. This is only relevant if you are using container hierarchies. If you define a BeanFactoryPostProcessor in one container, it will only do its stuff on the bean definitions in that container. Bean definitions in another container will not be post-processed by BeanFactoryPostProcessors in another container, even if both containers are part of the same hierarchy. | |
A bean factory post-processor is executed manually (in the case of a BeanFactory) or automatically (in the case of an ApplicationContext) to apply changes of some sort to the configuration metadata that defines a container. Spring includes a number of pre-existing bean factory post-processors, such as PropertyResourceConfigurer and PropertyPlaceholderConfigurer, both described below, and BeanNameAutoProxyCreator, which is very useful for wrapping other beans transactionally or with any other kind of proxy, as described later in this manual. The BeanFactoryPostProcessor can be used to add custom property editors.
In a BeanFactory, the process of applying a BeanFactoryPostProcessor is manual, and will be similar to this:
XmlBeanFactory factory = new XmlBeanFactory(new FileSystemResource("beans.xml"));

// bring in some property values from a Properties file
PropertyPlaceholderConfigurer cfg = new PropertyPlaceholderConfigurer();
cfg.setLocation(new FileSystemResource("jdbc.properties"));

// now actually do the replacement
cfg.postProcessBeanFactory(factory);
This explicit registration step is not convenient, and this is one of the reasons why the various ApplicationContext implementations are preferred above plain BeanFactory implementations in the vast majority of Spring-backed applications, especially when using BeanFactoryPostProcessors.
An ApplicationContext will detect any beans which are deployed into it which implement the BeanFactoryPostProcessor interface, and automatically use them as bean factory post-processors, at the appropriate time. Nothing else needs to be done other than deploying these post-processor in a similar fashion to any other bean.
| Note |
|---|---|
Just as in the case of BeanPostProcessors, you typically don't want to have BeanFactoryPostProcessors marked as being lazily-initialized. If they are marked as such, then the Spring container will never instantiate them, and thus they won't get a chance to apply their custom logic. If you are using the 'default-lazy-init' attribute on the declaration of your <beans/> element, be sure to mark your various BeanFactoryPostProcessor bean definitions with 'lazy-init="false"'. | |
The PropertyPlaceholderConfigurer, implemented as a bean factory post-processor, is used to externalize some property values from a BeanFactory definition, into another separate file in the standard Java Properties format. This is useful to allow the person deploying an application to customize some key properties (for example database URLs, usernames and passwords), without the complexity or risk of modifying the main XML definition file or files for the container.
Consider the following XML-based configuration metadata fragment, where a DataSource with placeholder values is defined. We will configure some properties from an external Properties file, and at runtime, we will apply a PropertyPlaceholderConfigurer to the metadata which will replace some properties of the datasource:
<bean id="dataSource" destroy-method="close"
      class="org.apache.commons.dbcp.BasicDataSource">
    <property name="driverClassName" value="${jdbc.driverClassName}"/>
    <property name="url" value="${jdbc.url}"/>
    <property name="username" value="${jdbc.username}"/>
    <property name="password" value="${jdbc.password}"/>
</bean>
The actual values come from another file in the standard Java Properties format:
jdbc.driverClassName=org.hsqldb.jdbcDriver
jdbc.url=jdbc:hsqldb:hsql://production:9002
jdbc.username=sa
jdbc.password=root
The PropertyPlaceholderConfigurer doesn't only look for properties in the Properties file you specify, but also checks against the Java System properties if it cannot find a property you are trying to use. This behavior can be customized by setting the systemPropertiesMode property of the configurer. It has three values, one to tell the configurer to always override, one to let it never override and one to let it override only if the property cannot be found in the properties file specified. Please consult the Javadoc for the PropertiesPlaceholderConfigurer for more information.
The PropertyOverrideConfigurer, another bean factory post-processor, is similar to the PropertyPlaceholderConfigurer, but in contrast to the latter, the original definitions can have default values or no values at all for bean properties. If an overriding Properties file does not have an entry for a certain bean property, the default context definition is used.
Note that the bean factory definition is not aware of being overridden, so it is not immediately obvious when looking at the XML definition file that the override configurer is being used. In case that there are multiple PropertyOverrideConfigurer instances that define different values for the same bean property, the last one will win (due to the overriding mechanism).
Properties file configuration lines are expected to be in the format:
beanName.property=value
An example properties file might look like this:
dataSource.driverClassName=com.mysql.jdbc.Driver
dataSource.url=jdbc:mysql:mydb
This example file would be usable against a container definition which contains a bean called dataSource, which has driver and url properties.
Note that compound property names are also supported, as long as every component of the path except the final property being overridden is already non-null (presumably initialized by the constructors). In this example...
foo.fred.bob.sammy=123
... the sammy property of the bob property of the fred property of the foo bean is being set to the scalar value 123.
The org.springframework.beans.factory.FactoryBean interface is to be implemented by objects that are themselves factories.
The FactoryBean interface is a point of pluggability into the Spring IoC containers instantiation logic. If you have some complex initialization code that is better expressed in Java as opposed to a (potentially) verbose amount of XML, you can create your own FactoryBean, write the complex initialization inside that class, and then plug your custom FactoryBean into the container.
The FactoryBean interface provides three methods:
Object getObject(): has to return an instance of the object this factory creates. The instance can possibly be shared (depending on whether this factory returns singletons or prototypes).
boolean isSingleton(): has to return true if this FactoryBean returns singletons, false otherwise
Class getObjectType(): has to return either the object type returned by the getObject() method or null if the type isn't known in advance
The FactoryBean concept and interface is used in a number of places within the Spring Framework; at the time of writing there are over 50 implementations of the FactoryBean interface that ship with Spring itself.
Finally, there is sometimes a need to ask a container for an actual FactoryBean instance itself, not the bean it produces. This may be achieved by prepending the bean id with '&' (sans quotes) when calling the getBean method of the BeanFactory (including ApplicationContext). So for a given FactoryBean with an id of myBean, invoking getBean("myBean") on the container will return the product of the FactoryBean, but invoking getBean("&myBean") will return the FactoryBean instance itself.
While the beans package provides basic functionality for managing and manipulating beans, often in a programmatic way, the context package adds ApplicationContext, which enhances BeanFactory functionality in a more framework-oriented style. Many users will use ApplicationContext in a completely declarative fashion, not even having to create it manually, but instead relying on support classes such as ContextLoader to automatically start an ApplicationContext as part of the normal startup process of a J2EE web-app. Of course, it is still possible to programmatically create an ApplicationContext.
The basis for the context package is the ApplicationContext interface, located in the org.springframework.context package. Deriving from the BeanFactory interface, it provides all the functionality of BeanFactory. To allow working in a more framework-oriented fashion, using layering and hierarchical contexts, the context package also provides the following functionality:
MessageSource, providing access to messages in i18n-style
Access to resources, such as URLs and files
Event propagation to beans implementing the ApplicationListener interface
Loading of multiple (hierarchical) contexts, allowing each to be focused on one particular layer, for example the web layer of an application
As the ApplicationContext includes all functionality of the BeanFactory, it is generally recommended that it be used over the BeanFactory, except for a few limited situations such as perhaps in an Applet, where memory consumption might be critical, and a few extra kilobytes might make a difference. The following sections describe functionality that ApplicationContext adds to basic BeanFactory capabilities.
The ApplicationContext interface extends an interface called MessageSource, and therefore provides messaging (i18n or internationalization) functionality. Together with the HierarchicalMessageSource, capable of resolving hierarchical messages, these are the basic interfaces Spring provides to do message resolution. Let's quickly review the methods defined there:
String getMessage(String code, Object[] args, String default, Locale loc): the basic method used to retrieve a message from the MessageSource. When no message is found for the specified locale, the default message is used. Any arguments passed in are used as replacement values, using the MessageFormat functionality provided by the standard library.
String getMessage(String code, Object[] args, Locale loc): essentially the same as the previous method, but with one difference: no default message can be specified; if the message cannot be found, a NoSuchMessageException is thrown.
String getMessage(MessageSourceResolvable resolvable, Locale locale): all properties used in the methods above are also wrapped in a class named MessageSourceResolvable, which you can use via this method.
When an ApplicationContext gets loaded, it automatically searches for a MessageSource bean defined in the context. The bean has to have the name messageSource. If such a bean is found, all calls to the methods described above will be delegated to the message source that was found. If no message source was found, the ApplicationContext attempts to see if it has a parent containing a bean with the same name. If so, it uses that bean as the MessageSource. If it can't find any source for messages, an empty StaticMessageSource will be instantiated in order to be able to accept calls to the methods defined above.
Spring currently provides two MessageSource implementations. These are the ResourceBundleMessageSource and the StaticMessageSource. Both implement NestingMessageSource in order to do nested messaging. The StaticMessageSource is hardly ever used but provides programmatic ways to add messages to the source. The ResourceBundleMessageSource is more interesting and is the one we will provide an example for:
<beans>
  <bean id="messageSource"
        class="org.springframework.context.support.ResourceBundleMessageSource">
    <property name="basenames">
      <list>
        <value>format</value>
        <value>exceptions</value>
        <value>windows</value>
      </list>
    </property>
  </bean>
</beans>
This assumes you have three resource bundles defined on your classpath called format, exceptions and windows. Using the JDK standard way of resolving messages through ResourceBundles, any request to resolve a message will be handled. For the purposes of the example, lets assume the contents of two of the above resource bundle files are...
# in 'format.properties'
message=Alligators rock!
# in 'exceptions.properties'
argument.required=The '{0}' argument is required.Some (admittedly trivial) driver code to exercise the MessageSource functionality can be found below. Remember that all ApplicationContext implementations are also MessageSource implementations and so can be cast to the MessageSource interface.
public static void main(String[] args) {
    MessageSource resources = new ClassPathXmlApplicationContext("beans.xml");
    String message = resources.getMessage("message", null, "Default", null);
    System.out.println(message);
}
The resulting output from the above program will be...
Alligators rock!
So to summarize, the MessageSource is defined in a file called 'beans.xml' (this file exists at the root of your classpath). The 'messageSource' bean definition refers to a number of resource bundles via it's basenames property; the three files that are passed in the list to the basenames property exist as files at the root of your classpath (and are called format.properties, exceptions.properties, and windows.properties respectively).
Lets look at another example, and this time we will look at passing arguments to the message lookup; these arguments will be converted into strings and inserted into placeholders in the lookup message. This is perhaps best explained with an example:
<beans>

    <!-- this MessageSource is being used in a web application -->
    <bean id="messageSource" class="org.springframework.context.support.ResourceBundleMessageSource">
        <property name="baseName" value="WEB-INF/test-messages"/>
    </bean>

    <!-- let's inject the above MessageSource into this POJO -->
    <bean id="example" class="com.foo.Example">
        <property name="messages" ref="messageSource"/>
    </bean>

</beans>
public class Example {
private MessageSource messages;
public void setMessages(MessageSource messages) {
this.messages = messages;
}
public void execute() {
String message = this.messages.getMessage("argument.required",
new Object [] {"userDao"}, "Required", null);
System.out.println(message);
}
}The resulting output from the invocation of the execute() method will be...
The 'userDao' argument is required.
With regard to internationalization (i18n), Spring's various MessageResource implementations follow the same locale resolution and fallback rules as the standard JDK ResourceBundle. In short, and continuing with the example 'messageSource' defined previously, if you want to resolve messages against the British (en-GB) locale, you would create files called format_en_GB.properties, exceptions_en_GB.properties, and windows_en_GB.properties respectively.
Locale resolution is typically going to be managed by the surrounding environment of the application. For the purpose of this example though, we'll just manually specify the locale that we want to resolve our (British) messages against.
# in 'exceptions_en_GB.properties'
argument.required=Ebagum lad, the '{0}' argument is required, I say, required.
public static void main(final String[] args) {
MessageSource resources = new ClassPathXmlApplicationContext("beans.xml");
String message = resources.getMessage("argument.required",
new Object [] {"userDao"}, "Required", Locale.UK);
System.out.println(message);
}The resulting output from the running of the above program will be...
Ebagum lad, the 'userDao' argument is required, I say, required.
The MessageSourceAware interface can also be used to acquire a reference to any MessageSource that has been defined. Any bean that is defined in an ApplicationContext that implements the MessageSourceAware interface will be injected with the application context's MessageSource when it (the bean) is being created and configured.
Event handling in the ApplicationContext is provided through the ApplicationEvent class and ApplicationListener interface. If a bean which implements the ApplicationListener interface is deployed into the context, every time an ApplicationEvent gets published to the ApplicationContext, that bean will be notified. Essentially, this is the standard Observer design pattern. Spring provides three standard events:
Table 3.5. Built-in Events
| Event | Explanation |
|---|---|
| ContextRefreshedEvent | Event published when the ApplicationContext is initialized or refreshed. Initialized here means that all beans are loaded, singletons are pre-instantiated and the ApplicationContext is ready for use |
| ContextClosedEvent | Event published when the ApplicationContext is closed, using the close() method on the ApplicationContext. Closed here means that singleton beans are destroyed |
| RequestHandledEvent | A web-specific event telling all beans that a HTTP request has been serviced (i.e. this will be published after the request has been finished). Note that this event is only applicable for web applications using Spring's DispatcherServlet |
Implementing custom events can be done as well. Simply call the publishEvent() method on the ApplicationContext, specifying a parameter which is an instance of your custom event class implementing ApplicationEvent. Event listeners receive events synchronously. This means the publishEvent() method blocks until all listeners have finished processing the event (it is possible to supply an alternate event publishing strategy via a ApplicationEventMulticaster implementation). Furthermore, when a listener receives an event it operates inside the transaction context of the publisher, if a transaction context is available.
Let's look at an example. First, the ApplicationContext:
<bean id="emailer" class="example.EmailBean">
  <property name="blackList">
    <list>
      <value>[email protected]</value>
      <value>[email protected]</value>
      <value>[email protected]</value>
    </list>
  </property>
</bean>

<bean id="blackListListener" class="example.BlackListNotifier">
  <property name="notificationAddress" value="[email protected]"/>
</bean>
Now, let's look at the actual classes:
public class EmailBean implements ApplicationContextAware {

    private List blackList;
	private ApplicationContext ctx;

    public void setBlackList(List blackList) {
        this.blackList = blackList;
    }

    public void setApplicationContext(ApplicationContext ctx) {
        this.ctx = ctx;
    }

    public void sendEmail(String address, String text) {
        if (blackList.contains(address)) {
            BlackListEvent evt = new BlackListEvent(address, text);
            ctx.publishEvent(evt);
            return;
        }
        // send email...
    }
}
public class BlackListNotifier implements ApplicationListener {
private String notificationAddress;
public void setNotificationAddress(String notificationAddress) {
this.notificationAddress = notificationAddress;
}
public void onApplicationEvent(ApplicationEvent evt) {
if (evt instanceof BlackListEvent) {
// notify appropriate person...
}
}
}Of course, this particular example could probably be implemented in better ways (perhaps by using AOP features), but it should be sufficient to illustrate the basic event mechanism.
For optimal usage and understanding of application contexts, users should generally familiarize themselves with Spring's Resource abstraction, as described in the chapter entitled Chapter 4, Resources.
An application context is a ResourceLoader, able to be used to load Resources. A Resource is essentially a java.net.URL on steroids (in fact, it just wraps and uses a URL where appropriate), which can be used to obtain low-level resources from almost any location in a transparent fashion, including from the classpath, a filesystem location, anywhere describable with a standard URL, and some other variations. If the resource location string is a simple path without any special prefixes, where those resources come from is specific and appropriate to the actual application context type.
A bean deployed into the application context may implement the special marker interface, ResourceLoaderAware, to be automatically called back at initialization time with the application context itself passed in as the ResourceLoader.
A bean may also expose properties of type Resource, to be used to access static resources, and expect that they will be injected into it like any other properties. The person deploying the bean may specify those Resource properties as simple String paths, and rely on a special JavaBean PropertyEditor that is automatically registered by the context, to convert those text strings to actual Resource objects.
The location path or paths supplied to an ApplicationContext constructor are actually resource strings, and in simple form are treated appropriately to the specific context implementation (i.e. ClassPathXmlApplicationContext treats a simple location path as a classpath location), but may also be used with special prefixes to force loading of definitions from the classpath or a URL, regardless of the actual context type.
As opposed to the BeanFactory, which will often be created programmatically, ApplicationContext instances can be created declaratively using for example a ContextLoader. Of course you can also create ApplicationContext instances programmatically using one of the ApplicationContext implementations. First, let's examine the ContextLoader interface and its implementations.
The ContextLoader interface has two implementations: the ContextLoaderListener and the ContextLoaderServlet. They both have the same functionality but differ in that the listener version cannot be used in Servlet 2.2 compatible containers. Since the Servlet 2.4 specification, servlet context listeners are required to execute immediately after the servlet context for the web application has been created and is available to service the first request (and also when the servlet context is about to be shut down): as such a servlet context listener is an ideal place to initialize the Spring ApplicationContext. It is up to you as to which one you use, but all things being equal you should probably prefer ContextLoaderListener; for more information on compatibility, have a look at the Javadoc for the ContextLoaderServlet.
You can register an ApplicationContext using the ContextLoaderListener as follows:
<context-param>
  <param-name>contextConfigLocation</param-name>
  <param-value>/WEB-INF/daoContext.xml /WEB-INF/applicationContext.xml</param-value>
</context-param>

<listener>
  <listener-class>org.springframework.web.context.ContextLoaderListener</listener-class>
</listener>

<!-- or use the ContextLoaderServlet instead of the above listener
<servlet>
  <servlet-name>context</servlet-name>
  <servlet-class>org.springframework.web.context.ContextLoaderServlet</servlet-class>
  <load-on-startup>1</load-on-startup>
</servlet>
-->
The listener inspects the contextConfigLocation parameter. If it doesn't exist, it'll use /WEB-INF/applicationContext.xml as a default. When it does exist, it'll separate the String using predefined delimiters (comma, semi-colon and whitespace) and use the values as locations where application contexts will be searched for. The ContextLoaderServlet can be used instead of the ContextLoaderListener. The servlet will use the 'contextConfigLocation' parameter just as the listener does.
The majority of the code inside an application is best written in a DI style, where that code is served out of a Spring IoC container, has its own dependencies supplied by the container when it is created, and is completely unaware of the container. However, for the small glue layers of code that are sometimes needed to tie other code together, there is sometimes a need for singleton (or quasi-singleton) style access to a Spring IoC container. For example, third party code may try to construct new objects directly (Class.forName() style), without the ability to force it to get these objects out of a Spring IoC container. If the object constructed by the third party code is just a small stub or proxy, which then uses a singleton style access to a Spring IoC container to get a real object to delegate to, then inversion of control has still been achieved for the majority of the code (the object coming out of the container); thus most code is still unaware of the container or how it is accessed, and remains uncoupled from other code, with all ensuing benefits. EJBs may also use this stub/proxy approach to delegate to a plain Java implementation object, coming out of a Spring IoC container. While the Spring IoC container itself ideally does not have to be a singleton, it may be unrealistic in terms of memory usage or initialization times (when using beans in the Spring IoC container such as a Hibernate SessionFactory) for each bean to use its own, non-singleton Spring IoC container.
As another example, in a complex J2EE apps with multiple layers (i.e. various JAR files, EJBs, and WAR files packaged as an EAR), with each layer having its own Spring IoC container definition (effectively forming a hierarchy), the preferred approach when there is only one web-app (WAR) in the top hierarchy is to simply create one composite Spring IoC container from the multiple XML definition files from each layer. All of the various Spring IoC container implementations may be constructed from multiple definition files in this fashion. However, if there are multiple sibling web-applications at the root of the hierarchy, it is problematic to create a Spring IoC container for each web-application which consists of mostly identical bean definitions from lower layers, as there may be issues due to increased memory usage, issues with creating multiple copies of beans which take a long time to initialize (e.g. a Hibernate SessionFactory), and possible issues due to side-effects. As an alternative, classes such as ContextSingletonBeanFactoryLocator or SingletonBeanFactoryLocator may be used to demand-load multiple hierarchical (i.e. one is a parent of another) Spring IoC container instances in an effectively singleton fashion, which may then be used as the parents of the web-application Spring IoC container instances. The result is that bean definitions for lower layers are loaded only as needed, and loaded only once.
You can see a detailed example of their usage in SingletonBeanFactoryLocator and ContextSingletonBeanFactoryLocator by viewing their respective Javadocs.
As mentioned in the chapter on EJBs, the Spring convenience base classes for EJBs normally use a non-singleton BeanFactoryLocator implementation, which is easily replaced by the use of SingletonBeanFactoryLocator and ContextSingletonBeanFactoryLocator if there is a need.
[1] See the section entitled Background
[2] See the section entitled Section 3.3.1, “Injecting dependencies”